고정 헤더 영역
상세 컨텐츠
본문
https://city-kim.tistory.com/18
Vue3, unit test, e2e, chromatic github ci구성(1) - 프로젝트 구성
Vue3와 Vite, Vitest unit test, cypress e2e test, storybook과 chromatic의 시각화 테스트를 구현하고 github ci로 자동화를 해보도록 한다 Vite를 활용해서 Vue3 프로젝트를 생성하고 테스트를 구성해보자 패키지매
city-kim.tistory.com
프로젝트 구성이 끝났다면 이제 workflows를 추가하여 github actions에 자동화를 구성해보도록 하자
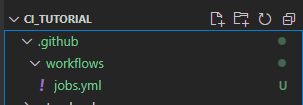
root 디렉토리에 .github/workflows/jobs.yml를 생성하고 unit_test를 실행하도록 설정한다
https://docs.github.com/en/actions/using-workflows/workflow-syntax-for-github-actions
Workflow syntax for GitHub Actions - GitHub Docs
docs.github.com
# .github/workflows/jobs.yml
name: job

on:
  pull_request:
    branches: [ main ]

jobs:
  # unit test를 실행한다
  unit_test:
    runs-on: ubuntu-latest
    steps:
    - uses: actions/checkout@v3
    - uses: pnpm/action-setup@v2
      with:
        version: 8
    - name: Use Node.js
      uses: actions/setup-node@v3
      with:
        node-version: '18.x'
        cache: 'pnpm'
    - run: pnpm install
    - run: pnpm test:unit
name은 job으로 하고 main 브랜치에 pr이 생성되면 실행하도록 해준다
pnpm은 아직 기본 패키지매니저로 포함되어있지 않기 때문에 pnpm/action-setup으로 환경을 구성해준다
이후 command로 unit test를 실행해준다
이후 job을 추가한 브랜치를 main 브랜치에 pr하면
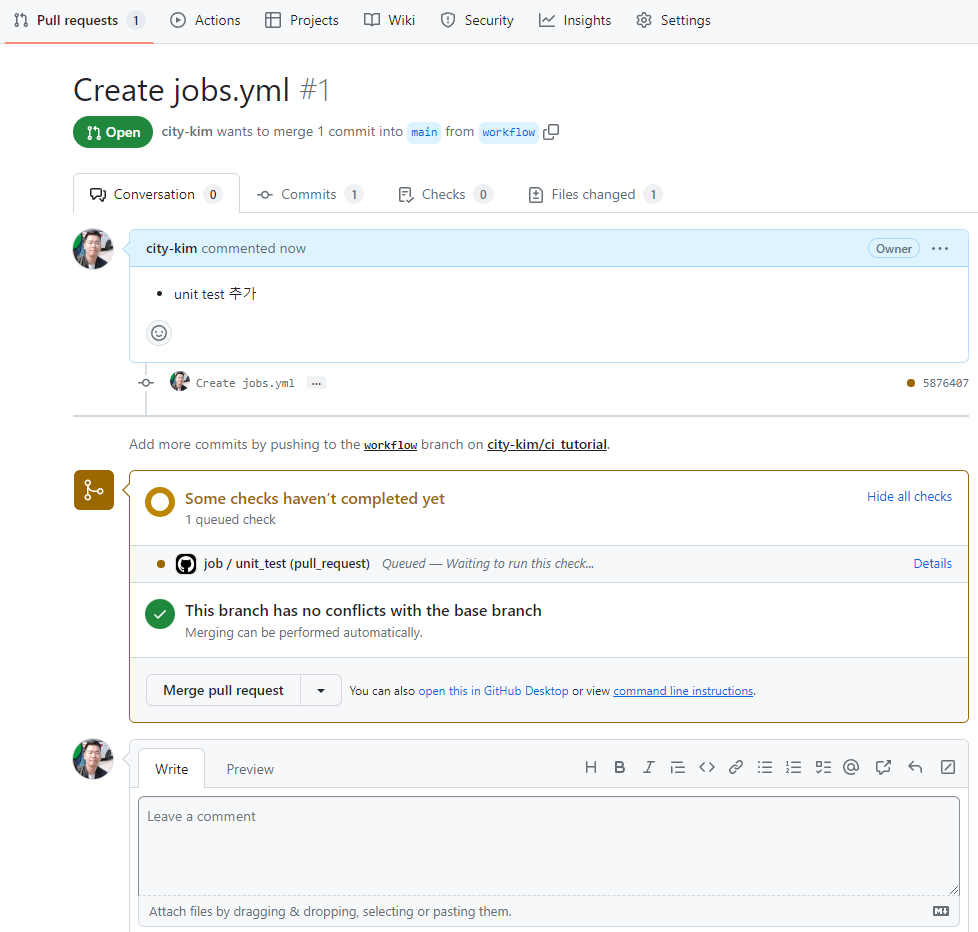
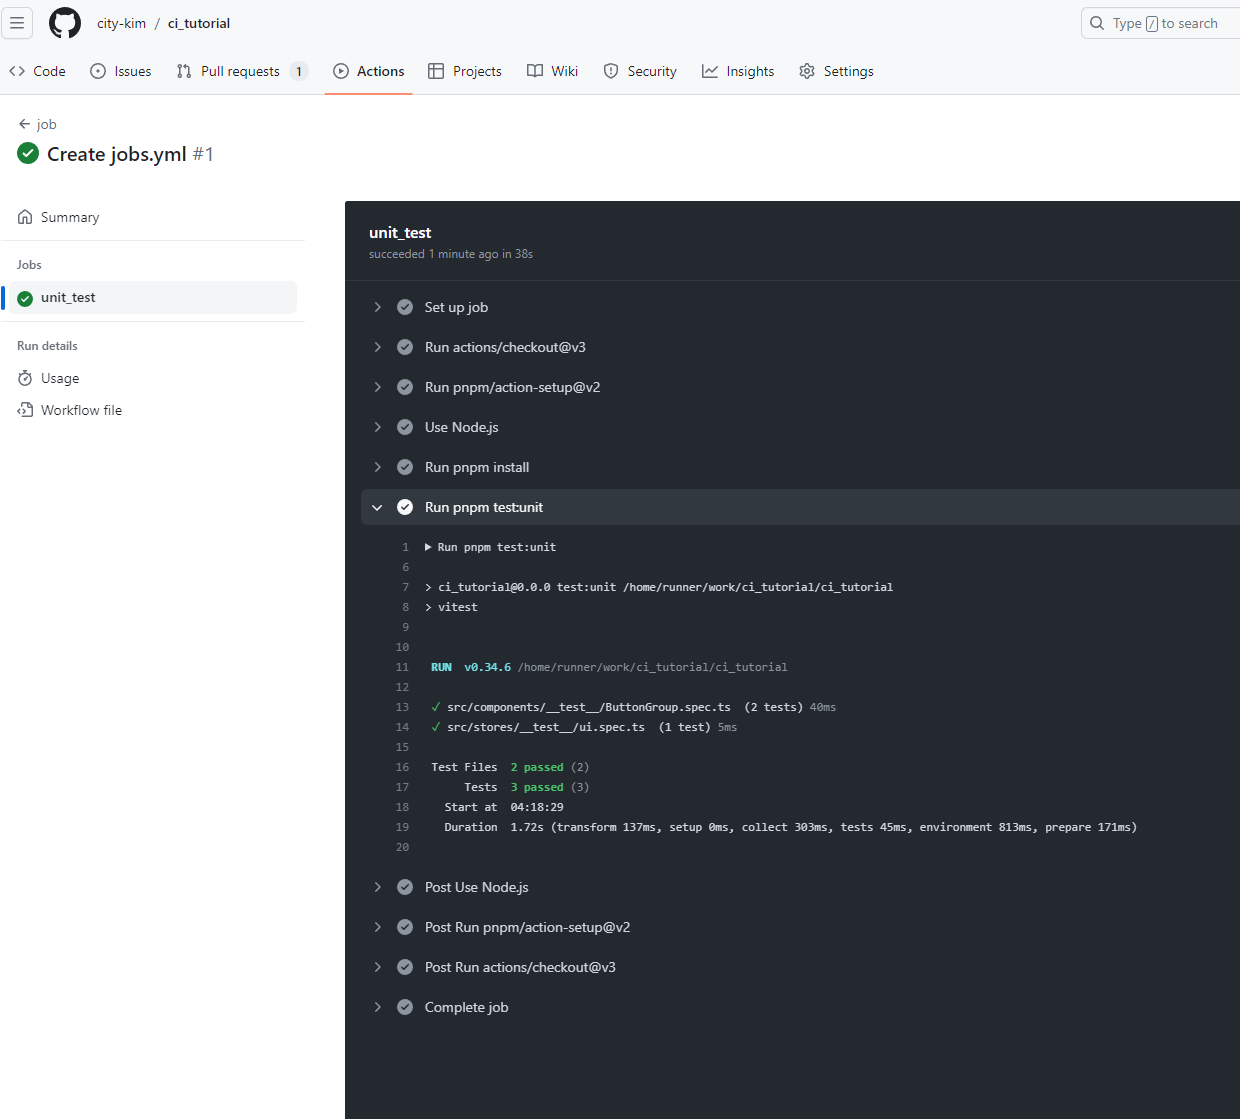
위와같이 unit test를 진행하는 것을 확인할 수 있다
pr을 닫고 e2e 테스트를 추가해보자
# .github/workflows/jobs.yml
... 생략 (이전에 작성한 unit_test 하위에 작성해준다)
# e2e 테스트를 실행한다
e2e_test:
needs: unit_test
runs-on: ubuntu-latest
steps:
- name: Checkout
uses: actions/checkout@v4
- name: Install pnpm
uses: pnpm/action-setup@v2
with:
version: 8
- name: Cypress run
uses: cypress-io/github-action@v6
with:
build: pnpm build
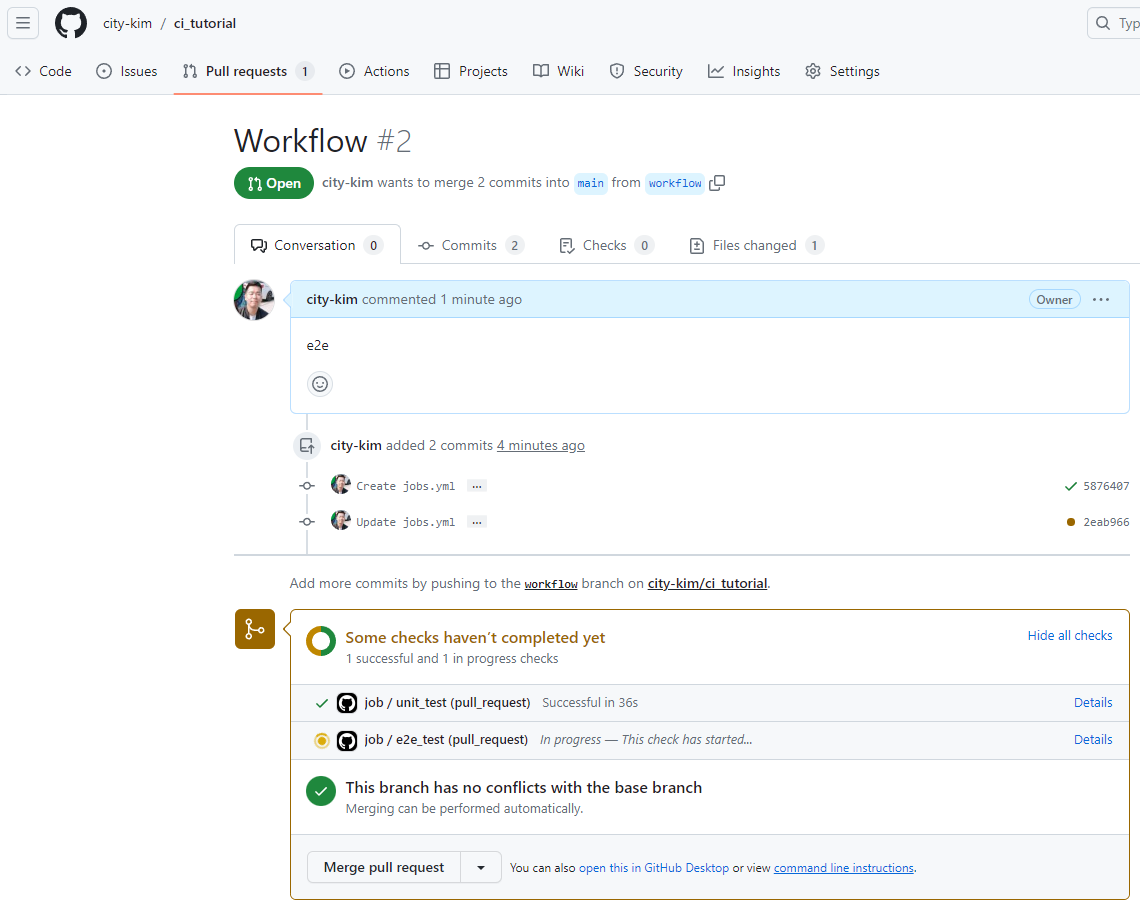
start: pnpm previewneeds로 unit_test를 지정하였기 떄문에 unit test가 끝나면 e2e 테스트를 진행한다
위 코드만 추가한다면 다음과 같이 에러가 발생하는데

cypress는 server가 현재 알 수 없다는 내용의 오류가 뜬다
이는 vite를 쓴다면 package scripts를 cypress의 기본 command와 달라서 생기는 문제이다
# .github/workflows/jobs.yml
... 생략 (이전에 작성한 e2e_test를 수정해준다)

      - name: Cypress run
        uses: cypress-io/github-action@v6
        with:
          build: pnpm build
          start: pnpm preview
cypress에 build와 start에 대한 command를 추가해준다
이후 pr을 생성하면
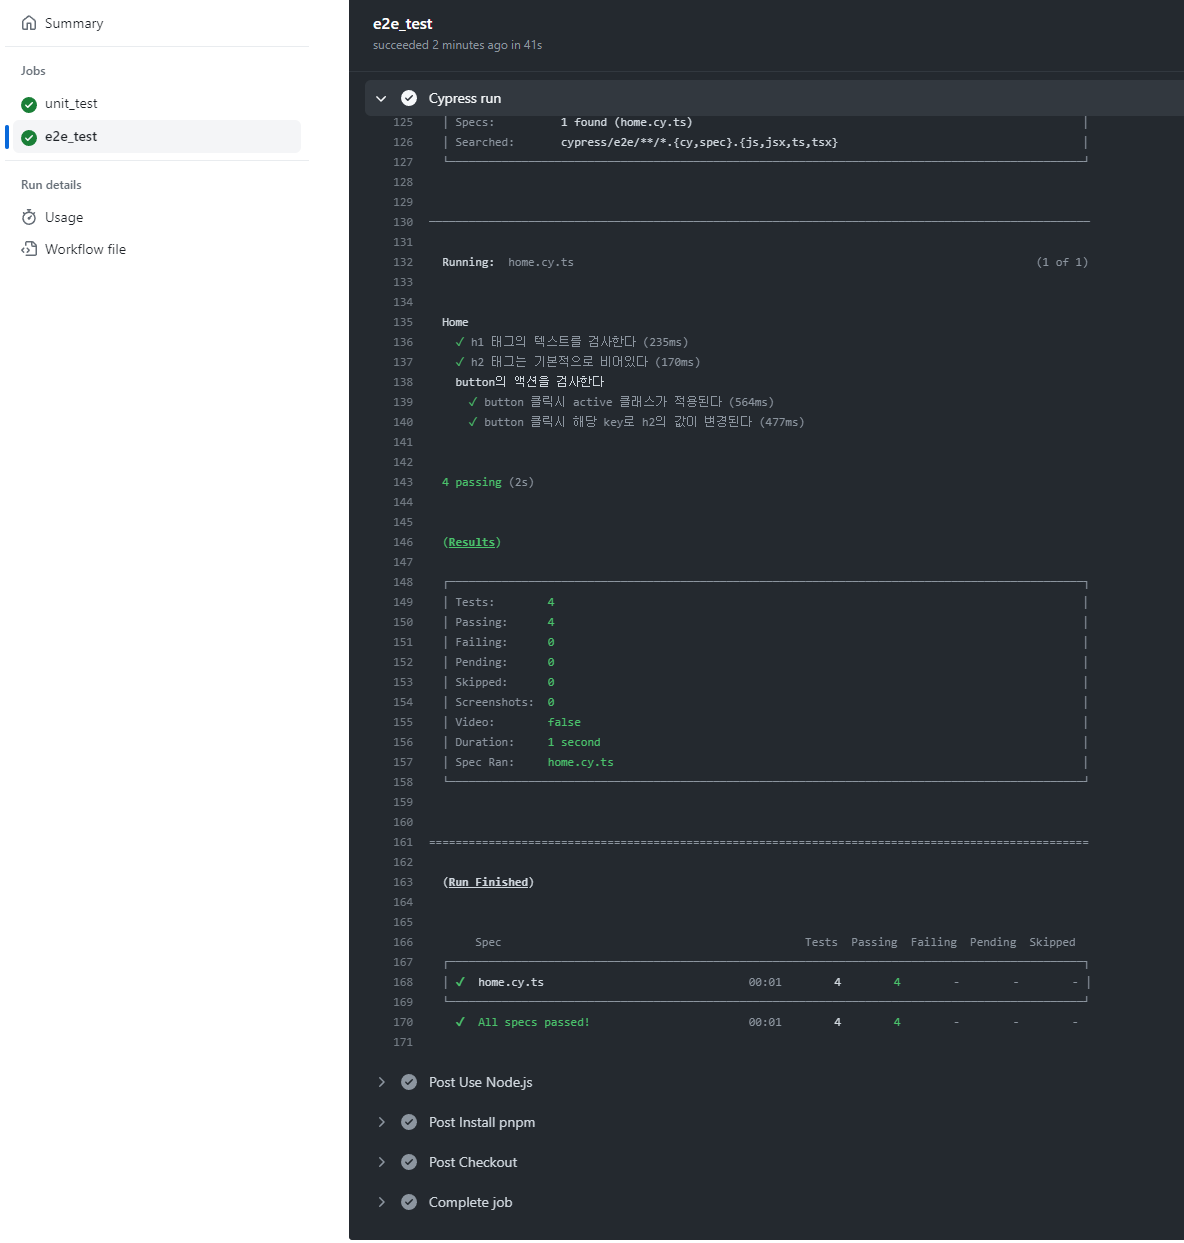
테스트가 통과하는걸 확인할 수 있다
다시 pr을 닫고 이번에는 chromatic을 추가해보자
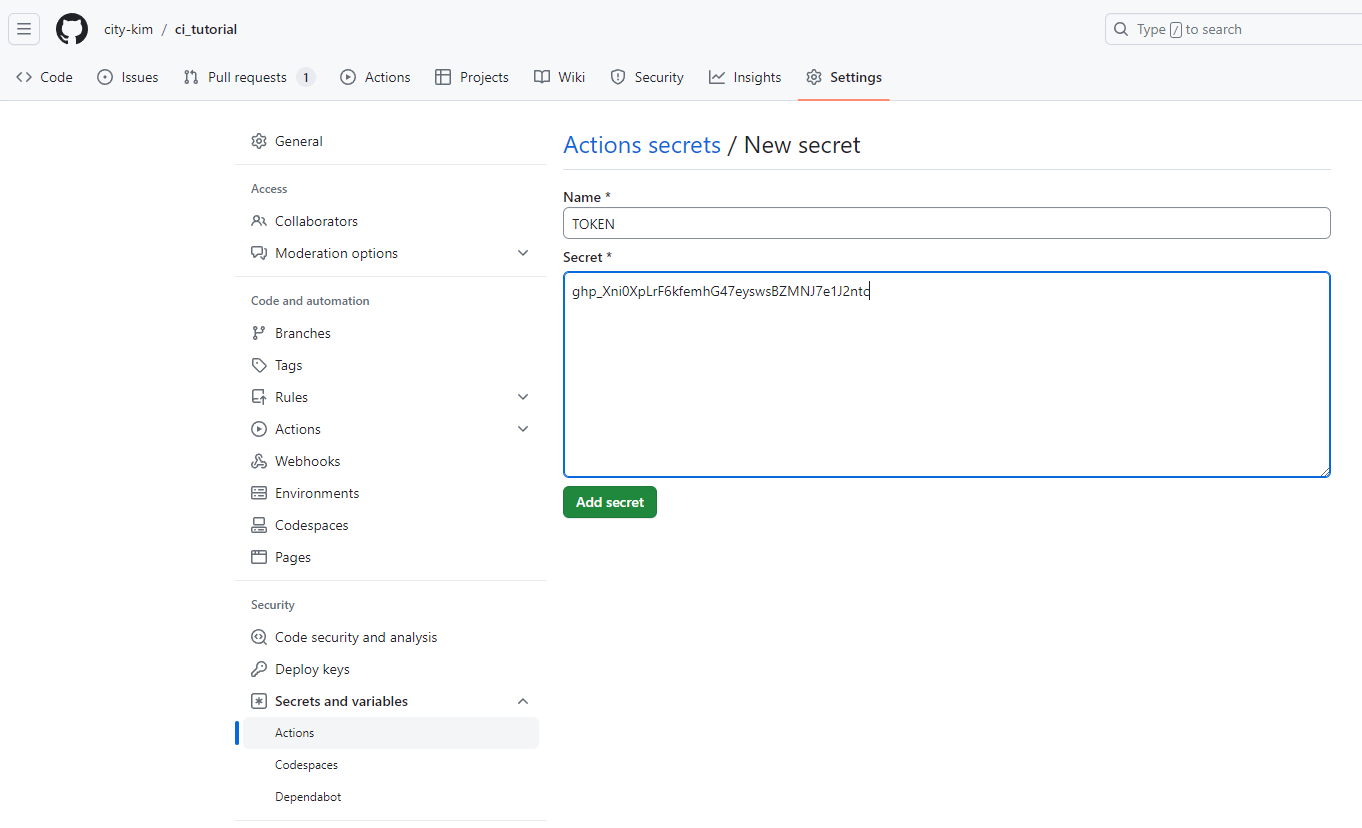
chromatic을 추가하려면 기존에 발급된 토큰을 github action secret에 등록하여야 한다
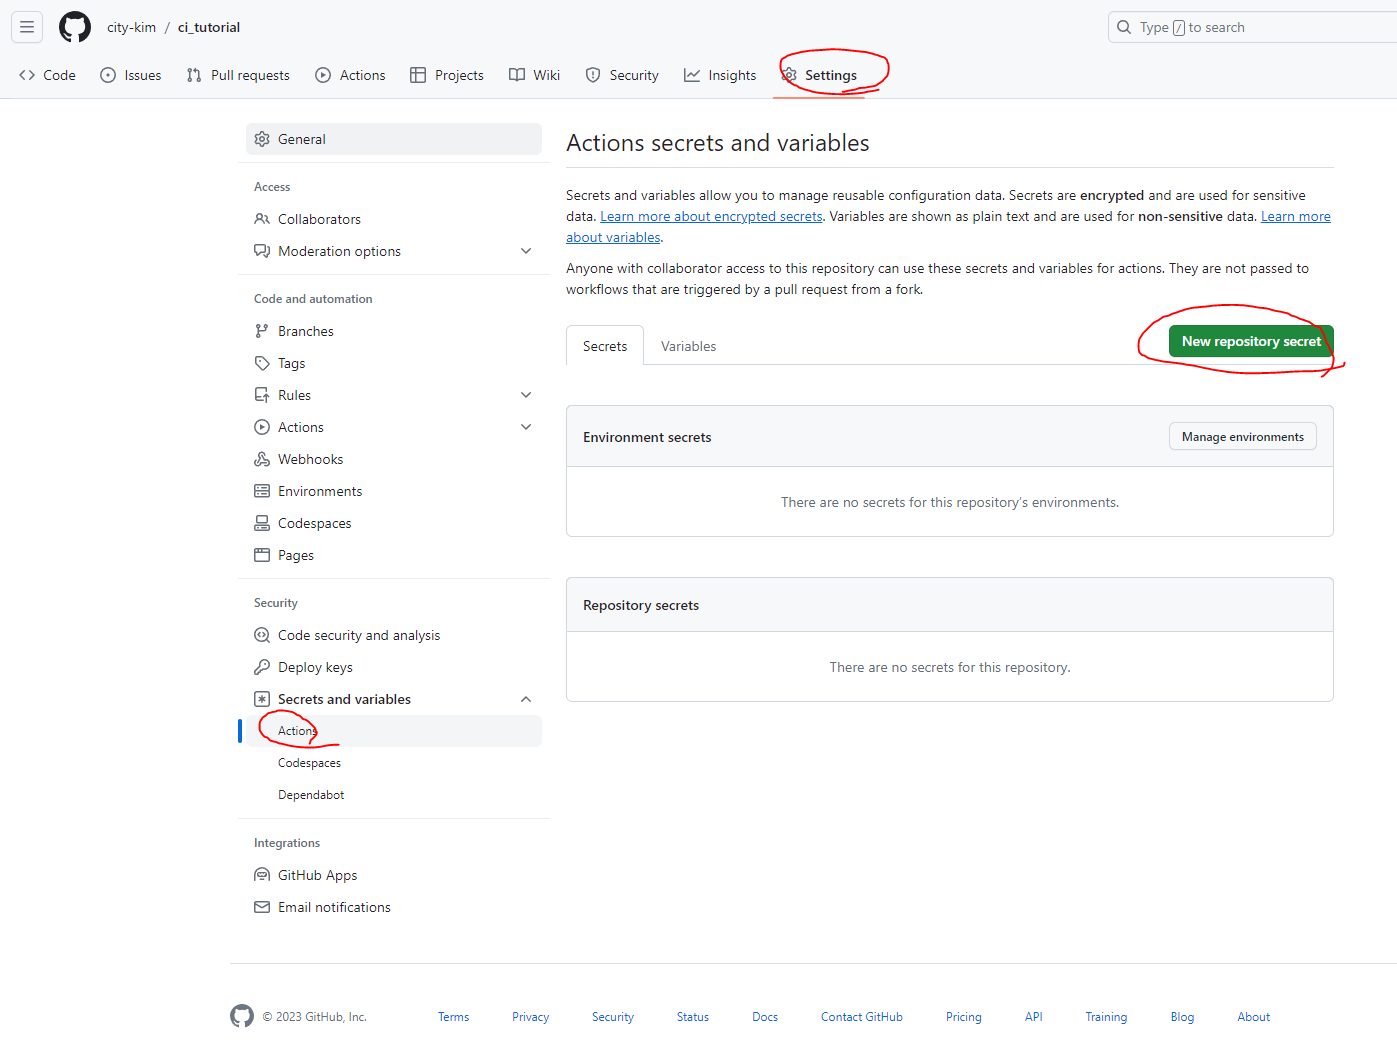
발급받은 토큰을 등록해준다
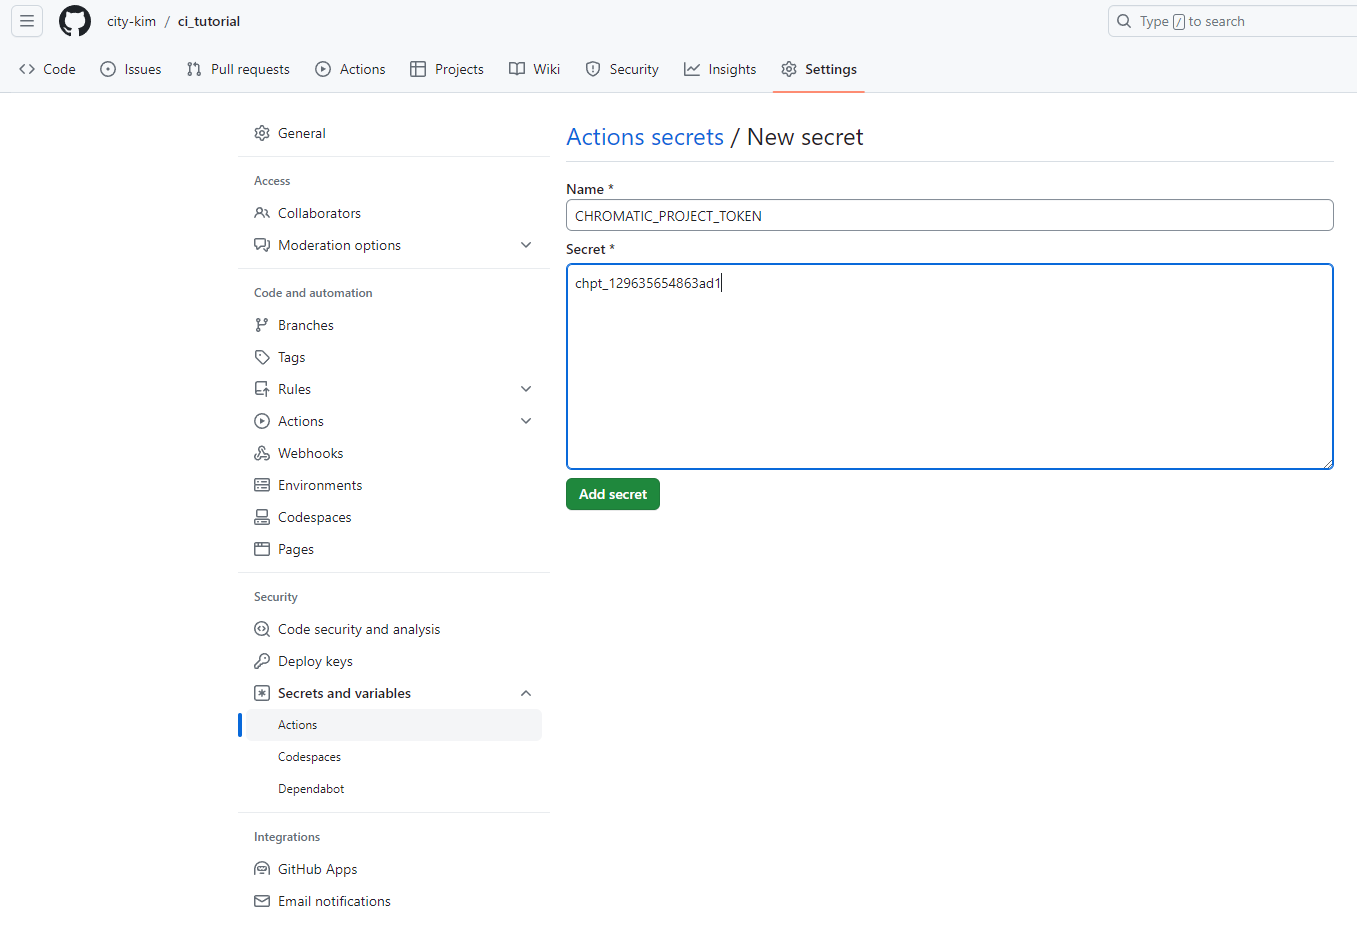
그리고 개인적으로 PR에 메시지를 작성해서 실패여부를 남기고싶기 때문에 그때 사용될 TOKEN도 하나 등록해주도록 한다
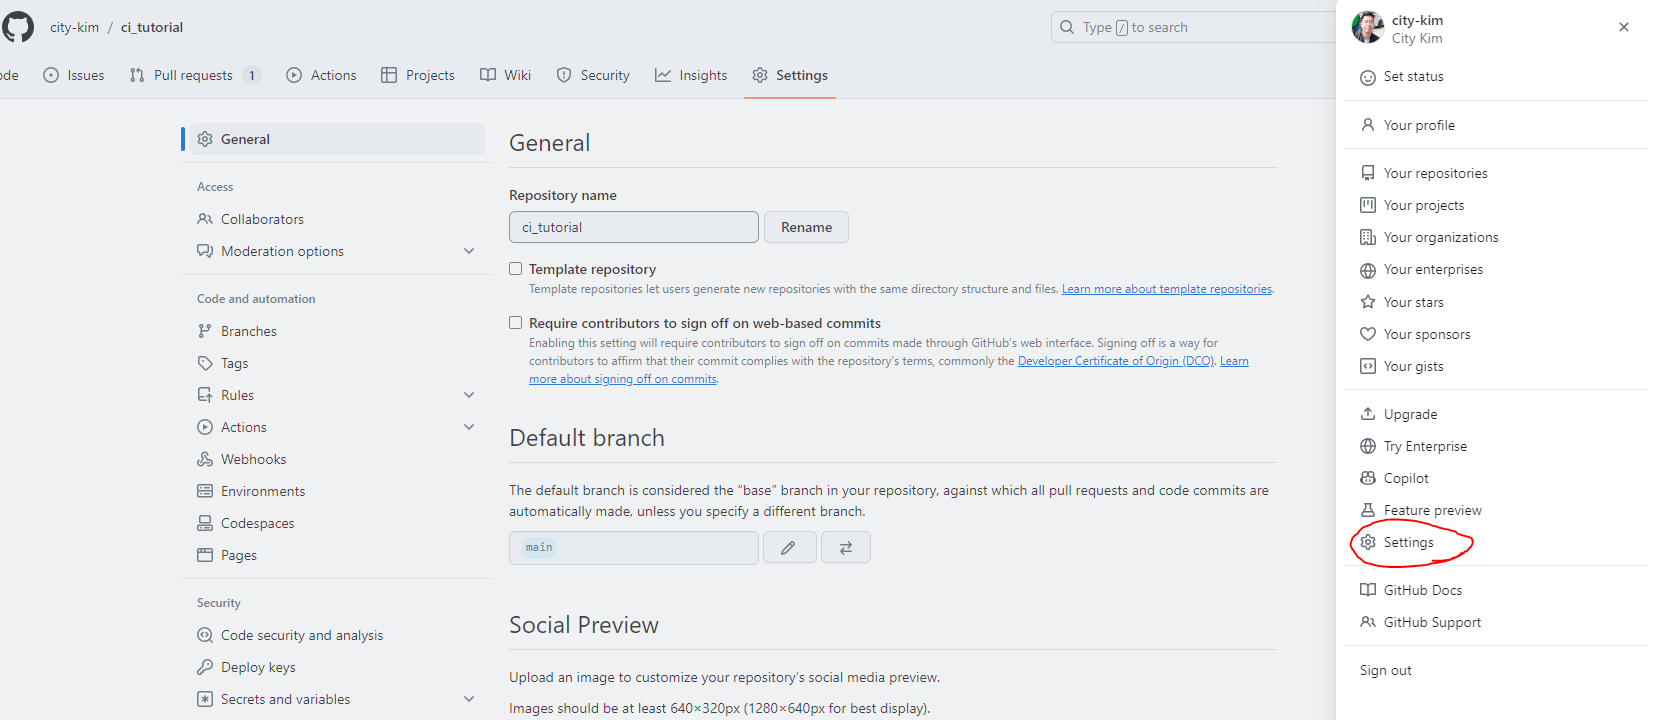
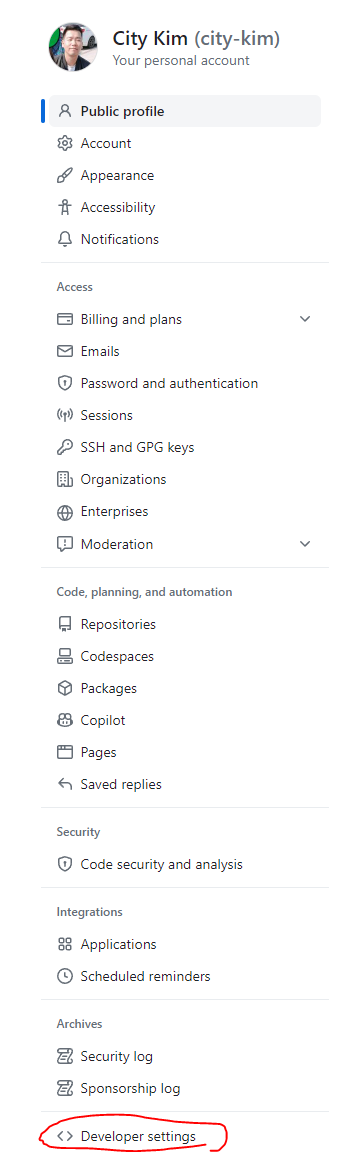
프로필의 settings로 이동하여 Developer Settings에서
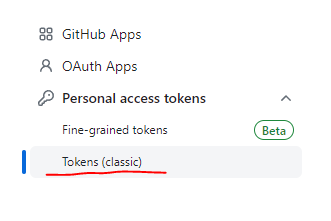
클래식 토큰을 생성해준다
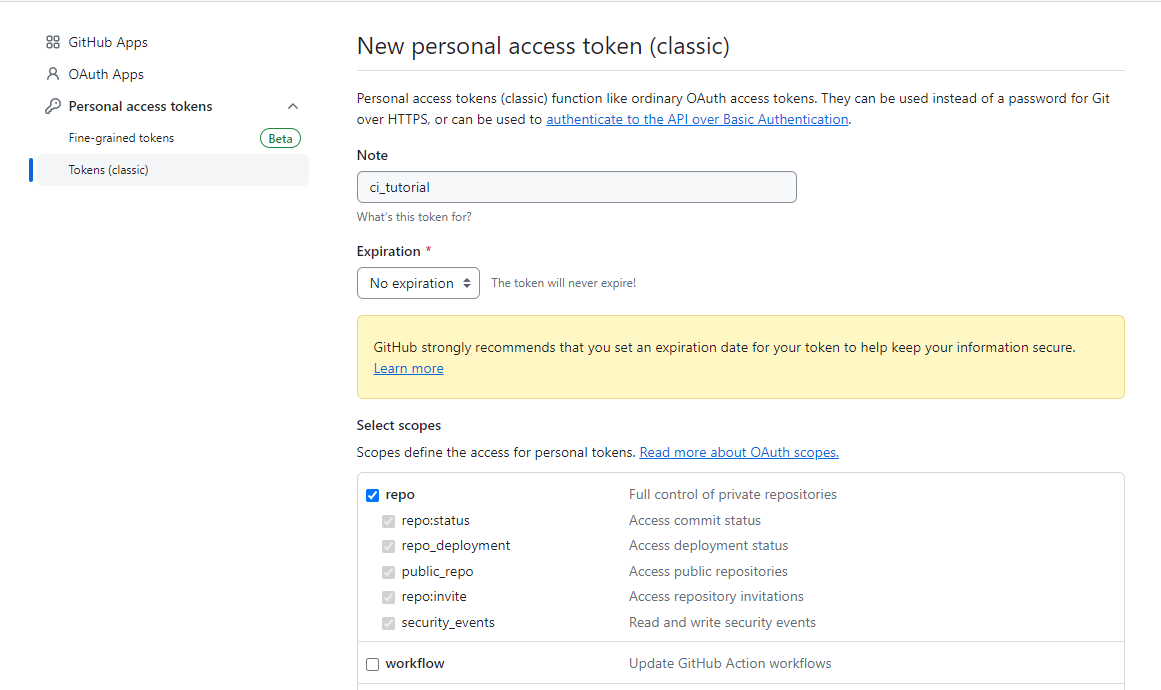
다음과같이 생성해준다
이후 생성된 토큰을
chromatic과 같은곳에 넣어준다
이제 chromatic과 test 결과를 출력해줄 메시지가 포함된 전문을 작성해준다
# ci_tutorial/.github/workflows/jobs.yml
name: job

on:
  pull_request:
    branches: [ main ]

jobs:
  # unit test를 실행한다
  unit_test:
    runs-on: ubuntu-latest
    steps:
    - uses: actions/checkout@v3
    - uses: pnpm/action-setup@v2
      with:
        version: 8
    - name: Use Node.js
      uses: actions/setup-node@v3
      with:
        node-version: '18.x'
        cache: 'pnpm'
    - run: pnpm install
    - run: pnpm test:unit
    # 성공 및 실패에 따라서 comment를 작성한다
    - name: Add comment to PR
      uses: actions/github-script@v6
      if: always()
      with:
        github-token: ${{ secrets.TOKEN }}
        script: |
          const name = '${{ github.workflow   }}';
          const url = '${{ github.server_url }}/${{ github.repository }}/actions/runs/${{ github.run_id }}';
          const success = '${{ job.status }}' === 'success';
          const body = `${name}: ${success ? '✅ 유닛테스트 통과' : '❌ 유닛테스트 실패'}\n${url}`;

          await github.rest.issues.createComment({
            issue_number: context.issue.number,
            owner: context.repo.owner,
            repo: context.repo.repo,
            body: body
          })
  # e2e 테스트를 실행한다
  e2e_test:
    needs: unit_test
    runs-on: ubuntu-latest

    steps:
      - name: Checkout
        uses: actions/checkout@v4
      - name: Install pnpm
        uses: pnpm/action-setup@v2
        with:
          version: 8
      - name: Cypress run
        uses: cypress-io/github-action@v6
        with:
          build: pnpm build
          start: pnpm preview
      # 성공 및 실패에 따라서 comment를 작성한다
      - name: Add comment to PR
        uses: actions/github-script@v6
        if: always()
        with:
          github-token: ${{ secrets.TOKEN }}
          script: |
            const name = '${{ github.workflow   }}';
            const url = '${{ github.server_url }}/${{ github.repository }}/actions/runs/${{ github.run_id }}';
            const success = '${{ job.status }}' === 'success';
            const body = `${name}: ${success ? '✅ e2e TEST 통과' : '❌ e2e TEST 실패'}\n${url}`;

            await github.rest.issues.createComment({
              issue_number: context.issue.number,
              owner: context.repo.owner,
              repo: context.repo.repo,
              body: body
            })
  # 테스트가 성공하면 chromatic을 실행한다
  chromatic-deployment:
    needs: [unit_test, e2e_test]
    runs-on: ubuntu-latest
    steps:
      - uses: actions/checkout@v4
        with:
          fetch-depth: 0
      - uses: pnpm/action-setup@v2
        with:
          version: 8
      - name: Install dependencies
        run: pnpm install
      - name: Publish to Chromatic
        uses: chromaui/action@v1
        with:
          projectToken: ${{ secrets.CHROMATIC_PROJECT_TOKEN }}
chromatic에서 actions/checkout의 fetch-depth를 0으로 설정한다
        with:
          fetch-depth: 0
그래야 모든 변경점을 불러와서 chromatic이 얼마나 내용이 변경된지 알게할 수 있다
이후 pr을 생성하면
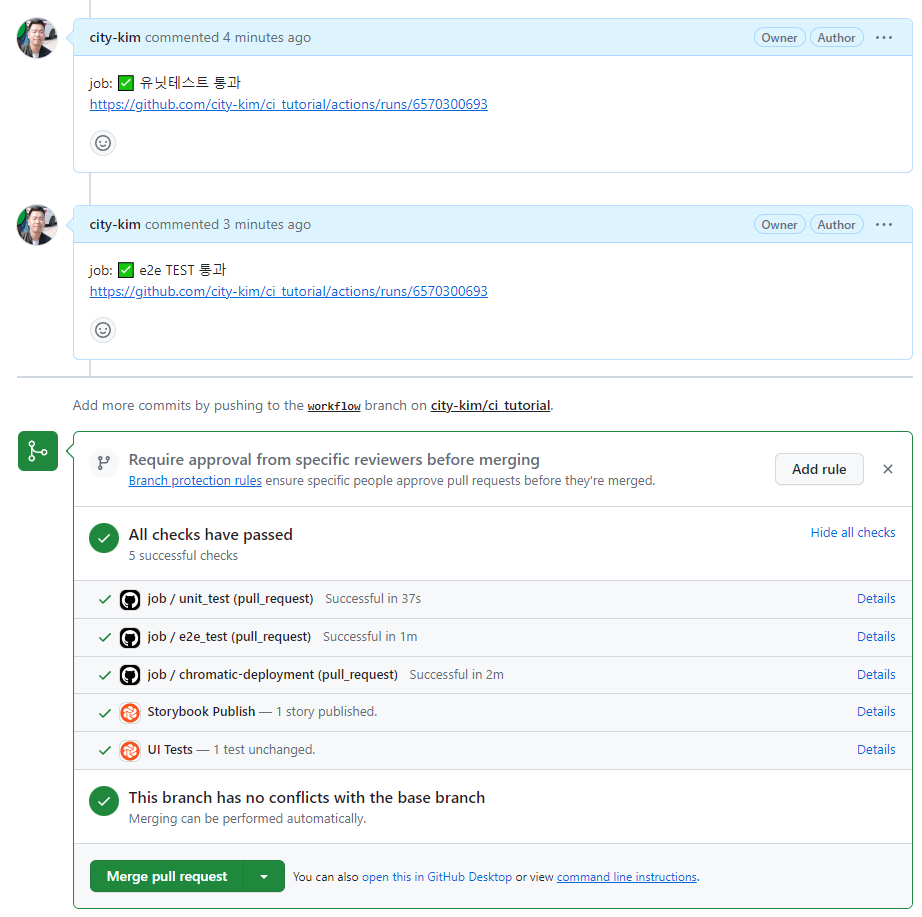
정상적으로 CI가 구성된걸 확인할 수 있다
만약 story가 일부 변경되면 pr에서 UI Tests가 pending 상태로 남게되고 chromatic에서 리뷰 및 반려를 할 수 있게된다
chromatic library
https://www.chromatic.com/library?appId=653095e5d0002c0c7b0cd092
Library <!-- --> • city-kim/ci_tutorial
www.chromatic.com
storybook
https://653095e5d0002c0c7b0cd092-gboqumsprq.chromatic.com/?path=/docs/stories-buttongroup--docs
@storybook/cli - Storybook
653095e5d0002c0c7b0cd092-gboqumsprq.chromatic.com
pull
https://github.com/city-kim/ci_tutorial/pull/3
Workflow by city-kim · Pull Request #3 · city-kim/ci_tutorial
github.com
github
https://github.com/city-kim/ci_tutorial
GitHub - city-kim/ci_tutorial: tistory 포스팅용으로 제작된 ci tutorial
tistory 포스팅용으로 제작된 ci tutorial. Contribute to city-kim/ci_tutorial development by creating an account on GitHub.
github.com
예시를 위해 이미지의 토큰을 별도로 모자이크하지않았다
글 작성 후 모두 바꿨다
'Vue & Nuxt' 카테고리의 다른 글
| Vue3, unit test, e2e, chromatic github ci구성(1) - 프로젝트 구성 (0) | 2023.10.18 |
|---|---|
| Nuxt 직접로그인, 소셜로그인 구현하기 (Nuxt-auth) (1) | 2023.06.15 |
| Nuxt.js로 openai api 연동하여 slack GPT채팅 만들기(4) - 대화 저장 (0) | 2023.03.30 |
| Nuxt.js로 openai api 연동하여 slack GPT채팅 만들기(3) - nuxt, slack, gpt연동 (0) | 2023.03.26 |
| Nuxt.js로 openai api 연동하여 slack GPT채팅 만들기(2) - gpt 연동 (0) | 2023.03.26 |


댓글 영역