고정 헤더 영역
상세 컨텐츠
본문
이번 포스팅에는 Nuxt.js에 인증을 구현해보도록 하자
setup
우선 nuxt를 설치한다
npx nuxi@latest init
인증은 nuxt/auth 모듈도 있지만 현 포스팅 기준으로는 nuxt의 공식 커뮤니티의 roadmap의 우선순위가 높지않으므로 약간 패키지가 불안정한 모습을 보이고 있기 때문에 이번에는 sidebase의 next-auth를 사용할 예정이다
https://nuxt.com/docs/community/roadmap
Roadmap · Nuxt
Nuxt is constantly evolving, with new features and modules being added all the time. See our blog for the latest framework and ecosystem announcements. Since January 2023, we've adopted a consistent release cycle for Nuxt 3, following semver. We aim for ma
nuxt.com
https://sidebase.io/nuxt-auth/getting-started
Introduction · sidebase
Checkout the 0.6-docs if you want to get get started with the local-provider or have a static Nuxt application. nuxt-auth is an open source Nuxt module that provides authentication for non-static Nuxt 3 applications. The easiest way to get started with nux
sidebase.io
설치할 패지키는 다음과 같다
추가적으로 약간의 스타일을 위해 sass만 설치해서 사용하였다
yarn add next-auth
yarn add @sidebase/nuxt-auth -D
yarn add sass
그리고 nuxt.config.ts 파일에 모듈과 css를 추가해준뒤, auth의 origin과 enableGlobalAppMiddleware를 추가하여 모든 페이지에 대한 인증을 하도록한다
// nuxt.config.ts
export default defineNuxtConfig({
  devtools: { enabled: true },
  modules: [ // 추가
    '@sidebase/nuxt-auth',
  ],
  css: [ // 추가
    '@/assets/scss/app.scss',
  ],
  auth: {
    origin: process.env.AUTH_ORIGIN, // auth origin
    enableGlobalAppMiddleware: true, // 모든페이지 인증여부
  },
})
그리고 .env파일을 생성하여 아래와같이 입력해준다
#.env
AUTH_ORIGIN=http://localhost:3000
AUTH_SECRET=asdhADvanidfvA!@d13dg34asdZXCASD #무작위 문자열을 입력한다
이후 page와 api를 추가해주는데
pages 폴더에 필요한 파일을 추가해준다
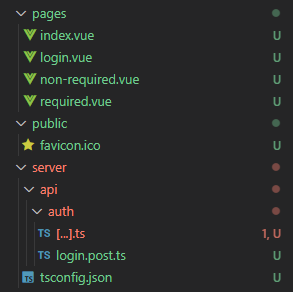
login.vue → 커스텀 로그인 페이지
index.vue → 항상 접근가능한 페이지
non-required.vue → 비로그인만 접근가능한 페이지
required.vue → 로그인만 접근 가능한 페이지
위와같이 추가해주었고 에러를 방지하기위해 각 파일에 다음과같이 틀만 추가해주었다
<script setup lang="ts">
</script>

<template>
  <div>
  </div>
</template>
server/api/auth에 [...].ts파일을 생성하여 auth 디렉토리의 포괄경로에 대한 라우팅을 추가해준다
https://nuxt.com/docs/guide/directory-structure/server#catch-all-route
server/ · Nuxt Directory Structure
Nuxt automatically scans files inside these directories to register API and server handlers with HMR support: ~/server/api~/server/routes~/server/middleware Each file should export a default function defined with defineEventHandler() or eventHandler() (ali
nuxt.com
이후 assets에 app.scss파일 하나를 생성해준다
Credentials(직접인증)
우선 직접인증을 추가해보자
인증 핸들러 옵션은 다음 문서에서 확인할 수 있다
https://sidebase.io/nuxt-auth/configuration/nuxt-auth-handler
NuxtAuthHandler · sidebase
After setting up nuxt-auth inside your nuxt.config.ts you can begin defining providers and other options inside your NuxtAuthHandler. In order to create your own NuxtAuthHandler, create the file ~/server/api/auth/[...].ts. This file will automatically set
sidebase.io
우선 직접인증만 구현하기 위해 추가해둔 server/api/auth/[...].ts 파일에 다음과같이 작성한다
// server/api/auth/[...].ts
import CredentialsProvider from 'next-auth/providers/credentials'
import { NuxtAuthHandler } from '#auth'

interface Credentials {
  username?: string
  password?: string
}

export default NuxtAuthHandler({
  pages: {
    signIn: '/login', // 로그인 페이지 경로
  },
  secret: process.env.AUTH_SECRET,
  providers: [
    // @ts-expect-error You need to use .default here for it to work during SSR. May be fixed via Vite at some point
    CredentialsProvider.default({
      name: 'Credentials',
      async authorize (credentials: Credentials) {
      	return {
          username: credentials?.username,
          password: credentials?.password
      	}
      }
    })
  ]
})
그리고 login.vue 파일에 임시 로그인에 필요한 코드를 작성해준다
// pages/login.vue
<script setup lang="ts">
const { signIn, signOut, data } = useAuth()

const username = ref('test') // 유저명 임시
const password = ref('citykim') // 비번 임시

</script>

<template>
  <div>
    <p>로그인</p>
    <input
      v-model="username"
      type="textx"
    >
    <input
      v-model="password"
      type="password"
    >
    <button
      @click="signIn('credentials', { username: username, password: password })"
    >
      로그인버튼
    </button>
    <button
      @click="signOut()"
    >
      로그아웃버튼
    </button>

    <pre>로그인데이터: {{ data }}</pre>
  </div>
</template>
이후 로그인을 동작해보면?
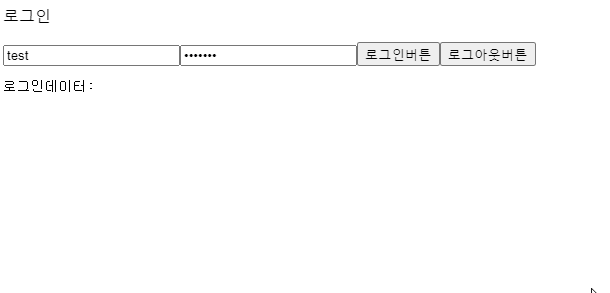
간단하게 동작하는걸 확인할 수 있다
이제 서버에 유저정보를 post하고 데이터를 받아오도록 수정해보자
데이터베이스를 구성하지않고 간단하게 만들어볼 예정이기 때문에 .env에 다음과같이 admin 정보를 추가하자
# .env
AUTH_ORIGIN=http://localhost:3000
AUTH_SECRET=asdhADvanidfvA!@d13dg34asdZXCASD

#임의 아이디와 비밀번호를 추가해준다
ADMIN_ID=test
ADMIN_PW=citykim
ADMIN_ID, ADMIN_PW를 추가하고 server/api/auth/login.post.ts에 다음과같이 작성한다
// server/api/auth/login.post.ts
export default defineEventHandler(async (event) => {
  // 로그인 구현
  const body = await readBody(event)
  const user = {
    name: process.env.ADMIN_ID,
    password: process.env.ADMIN_PW
  }
  if (body.username == user.name && body.password == user.password) {
    // 인증통과
    return {
      name: user.name,
      token: Math.random() * 1000000
    }
  }
  // 그외는 실패로 판단
  throw createError({
    statusCode: 403,
    statusMessage: 'authentication failed',
  })
})
api로 전달된 유저명이 env에 있는 정보와 일치하면 해당 정보를 반환한 뒤 토큰을 생성하고 일치하지 않으면 에러를 반환하도록 작성하였다
그리고 server/api/auth/[...].ts 파일도 서버에러 interface를 추가한뒤 아래와같이 수정해준다
// server/api/auth/[...].ts

// 서버 에러 interface 추가
interface ServerError extends Error {
  statusCode: number
  statusMessage: string
}

// CredentialsProvider.default 부분만 수정
    CredentialsProvider.default({
      name: 'Credentials',
      async authorize (credentials: Credentials) {
        try {
          const login = await $fetch('/api/auth/login', {
            method: 'POST',
            body: {
              username: credentials?.username,
              password: credentials?.password
            }
          })
          return login
        } catch (error: ServerError | unknown) {
          // 에러처리
          if (error) {
            // 에러가 존재하는경우
            const err: ServerError = error as ServerError
            // 메시지를 담아서 에러처리
            throw createError(err.statusMessage)
          }
          return null
        }
      }
    })
이후 login.vue 의 코드를 전체적으로 수정해준다
// pages/login.vue
<script setup lang="ts">
definePageMeta({
  auth: {
    unauthenticatedOnly: true,
    navigateAuthenticatedTo: '/',
  }
})

const { data, signIn, signOut } = useAuth()

const username = ref('test') // 유저명 임시
const password = ref('citykim') // 비번 임시
const errorMessage = ref('') // 에러메시지

async function login () {
  // 로그인하기
  errorMessage.value = '' // 에러초기화
  const { error, url } = await signIn('credentials', {
    username: username.value,
    password: password.value,
    redirect: false
  })

  if (error) {
    // 에러가 존재하는 경우
    errorMessage.value = error
  } else {
    // 에러가 없는 경우 원래 목적지로 이동
    return navigateTo(url, { external: true })
  }
}
</script>

<template>
  <div>
    <p>임시로그인</p>
    <input
      v-model="username"
      type="textx"
    >
    <input
      v-model="password"
      type="password"
    >
    <button @click="login()">로그인</button>
    <button @click="signOut()">로그아웃버튼</button>

    <div v-show="errorMessage">에러: {{ errorMessage }}</div>
    <pre v-show="data">로그인데이터: {{ data }}</pre>
  </div>
</template>
이후 테스트를 해보면
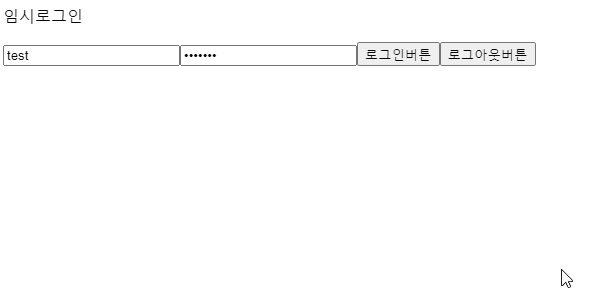
에러메시지도 출력되고 잘 동작하는걸 볼 수 있다
Restrict access
이제 페이지에 접근을 제한하도록 추가해보자
guest mode문서에서 unauthenticatedOnly를 추가하면 각각 로그인 또는 비로그인의 접근을 제한한할 수 있는데 전역으로 인증을 하지 않을경우 동작이 원할하지 않은 문제가 있다
https://sidebase.io/nuxt-auth/application-side/guest-mode
Guest Mode · sidebase
This feature was added in v0.5.0 of nuxt-auth. You can use nuxt-auth to setup pages that are accessible only when the user is not logged in. This is sometimes called "guest mode". The behavior of such a page is as follows: A logged in user visits the page
sidebase.io
우선 app.vue 페이지의 코드를 수정해준다
// app.vue
<script setup lang="ts">
  const { data, signOut } = useAuth()
</script>
<template>
  <div class="app">
    <header>
      <nav>
        <NuxtLink href="/">항상 접근가능</NuxtLink>
        <NuxtLink href="/required">로그인만 접근가능</NuxtLink>
        <NuxtLink href="/non-required">비로그인 접근가능</NuxtLink>
      </nav>
      <fieldset>
        <button @click="signOut()">로그아웃버튼</button>
      </fieldset>
    </header>
    <div class="contents">
      <NuxtPage />
    </div>
    <pre v-show="data">로그인데이터: {{ data }}</pre>
  </div>
</template>
NuxtLink로 각각 페이지를 이동하게 하고 로그아웃 버튼 및 데이터 출력을 app.vue 페이지로 이동시킨다
그리고 login.vue 페이지를 수정해준다
// pages/login.vue
<script setup lang="ts">
definePageMeta({
  auth: {
    unauthenticatedOnly: true,
    navigateAuthenticatedTo: '/',
  }
})

const { signIn } = useAuth() // data와 signOut을 삭제해준다

const username = ref('test')
const password = ref('citykim')
const errorMessage = ref('')

async function login () {
  // 로그인하기
  errorMessage.value = ''
  const { error, url } = await signIn('credentials', {
    username: username.value,
    password: password.value,
    redirect: false
  })

  if (error) {
    errorMessage.value = error
  } else {
    return navigateTo(url, { external: true })
  }
}
</script>

<template>
  <div>
    <p>임시로그인</p>
    <input
      v-model="username"
      type="textx"
    >
    <input
      v-model="password"
      type="password"
    >
    <button @click="login()">로그인</button>
    <!-- 로그아웃 버튼을 삭제해준다 -->

    <div v-show="errorMessage">에러: {{ errorMessage }}</div>
    <!-- data 출력하는 부분을 삭제해준다 -->
  </div>
</template>
이후 assets/scss/app.scss 파일에 코드를 추가해준다
html, body {
  height:100%;
}

@mixin anchor {
  padding: 0.5rem 1rem;
  border: 1px solid #ccc;
  border-radius: 0.25rem;
  color: #333;
  text-decoration: none;
  transition: all 0.2s ease-in-out;
  &:hover {
    background-color: #eee;
  }
}

.app {
  max-width: 1200px;
  margin: 0 auto;
  header {
    display: flex;
    gap: 1rem;
    align-items: center;
    justify-content: space-between;
    nav {
      display: flex;
      gap: 1rem;
      a {
        @include anchor;
      }
    }
    fieldset {
      margin: 0;
      padding: 0;
      border: none;
      button {
        @include anchor;
        cursor: pointer;
      }
    }
  }
}

.contents {
  padding-top: 5rem;
  text-align: center;
}
이제 index.vue 페이지의 코드를 수정해준다
// pages/index.vue
<script setup lang="ts">
definePageMeta({
  auth: false
})
</script>

<template>
  <div>
    항상접근가능
  </div>
</template>
definePageMeta에서 auth를 false로 하여 로그인, 비로그인 유저가 항상 접근할 수 있도록 해준다
이후 non-required.vue페이지의 코드를 수정해준다
// pages/non-required.vue
<script setup lang="ts">
definePageMeta({
  auth: {
    unauthenticatedOnly: true, // 비로그인만 접근가능여부
    navigateAuthenticatedTo: '/', // 인증된 사용자를 redirect할 경로
  },
})
</script>

<template>
  <div>
    비 로그인만 접급가능
  </div>
</template>
definePageMeta에서 auth의 unauthenticatedOnly와 navigateAuthenticatedTo를 설정하여 로그인 사용자는 index페이지로 이동하도록 해준다
그다음 required.vue페이지의 코드를 수정해준다
// pages/required.vue
<script setup lang="ts">
</script>

<template>
  <div>
    로그인만 접근가능
  </div>
</template>
글로벌 인증이 설정되어 있기 때문에 해당 페이지는 텍스트만 수정해준다
이제 잘 동작하는지 확인 해보자

index는 항상 접근이 가능하고 로그인, 비로그인 페이지도 잘 동작하는걸 확인할 수 있다
providers
이제 소셜 로그인을 추가해보자
소셜로그인은 먼저 key값을 받아와야하는데
github과 kakao, google의 key값을 가져오는 방법을 알아보자
github
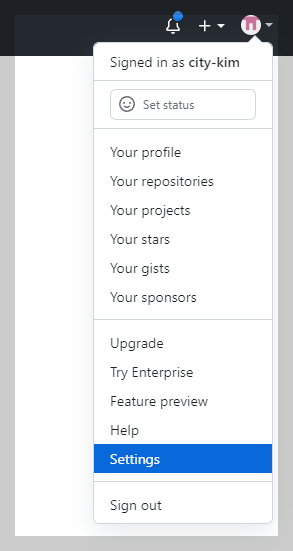
github 사이트 우측 상단의 Settings에 들어가서
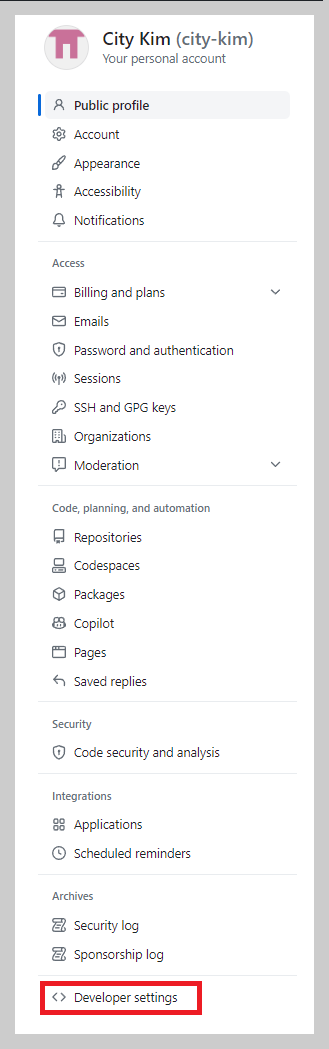
세팅 하단에 Developer settings로 이동한다
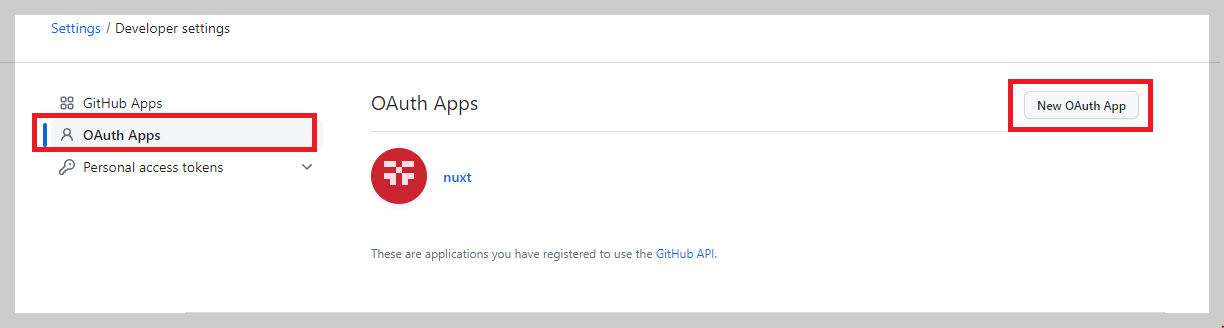
그리고 OAuth Apps에서 New OAuth App을 클릭하여 인증 앱을 추가해준다
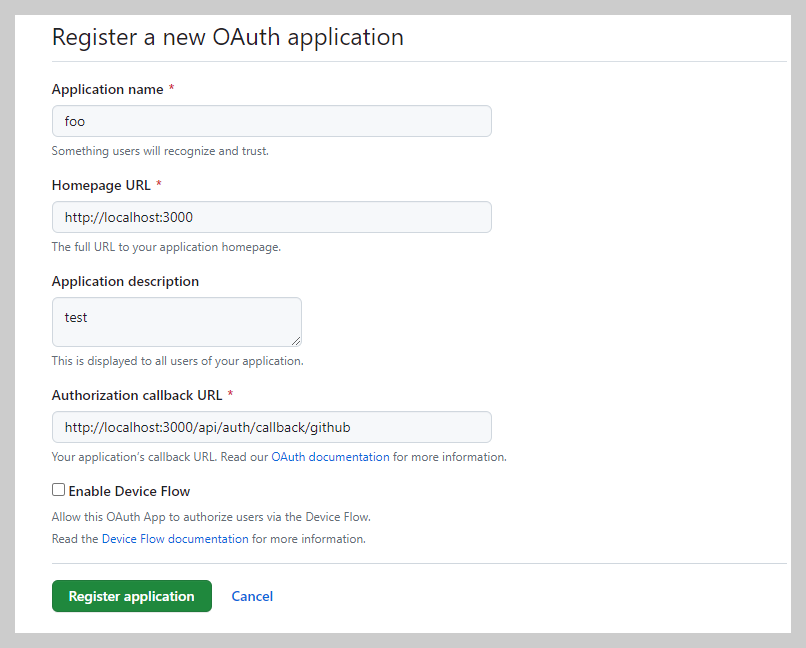
정보를 작성해준뒤 Authorization callback URL을 작성해주는데 이 경로는 AUTH_ORIGIN + /api/auth/callback/github 형태로 작성한다
포괄경로 라우팅으로 인증을 작성했기 때문에 callback으로 전달되는 providers의 엔드포인트가 [...].ts에 작성한 코드에 바로 동작하게된다
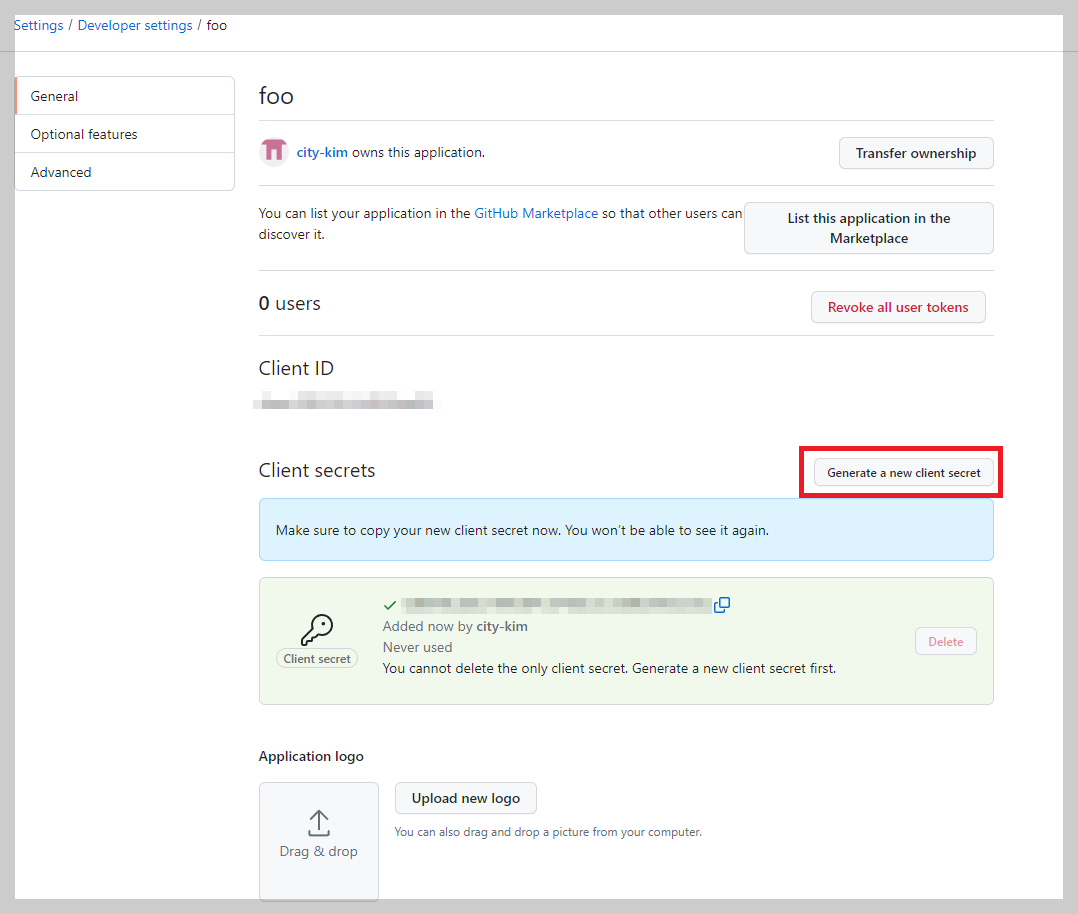
이후 Generate a new client secret을 클릭하여 Client secrets와 Client ID를 복사해준다
그리고 해당 코드를 .env에 추가해준다
# .env
AUTH_ORIGIN=http://localhost:3000
AUTH_SECRET=asdhADvanidfvA!@d13dg34asdZXCASD

ADMIN_ID=test
ADMIN_PW=citykim

# id와 secret을 추가해준다
GITHUB_CLIENT_ID=foo
GITHUB_CLIENT_SECRET=bar
KAKAO
https://developers.kakao.com/console/app
카카오계정
accounts.kakao.com
카카오 개발자 사이트로 이동하여
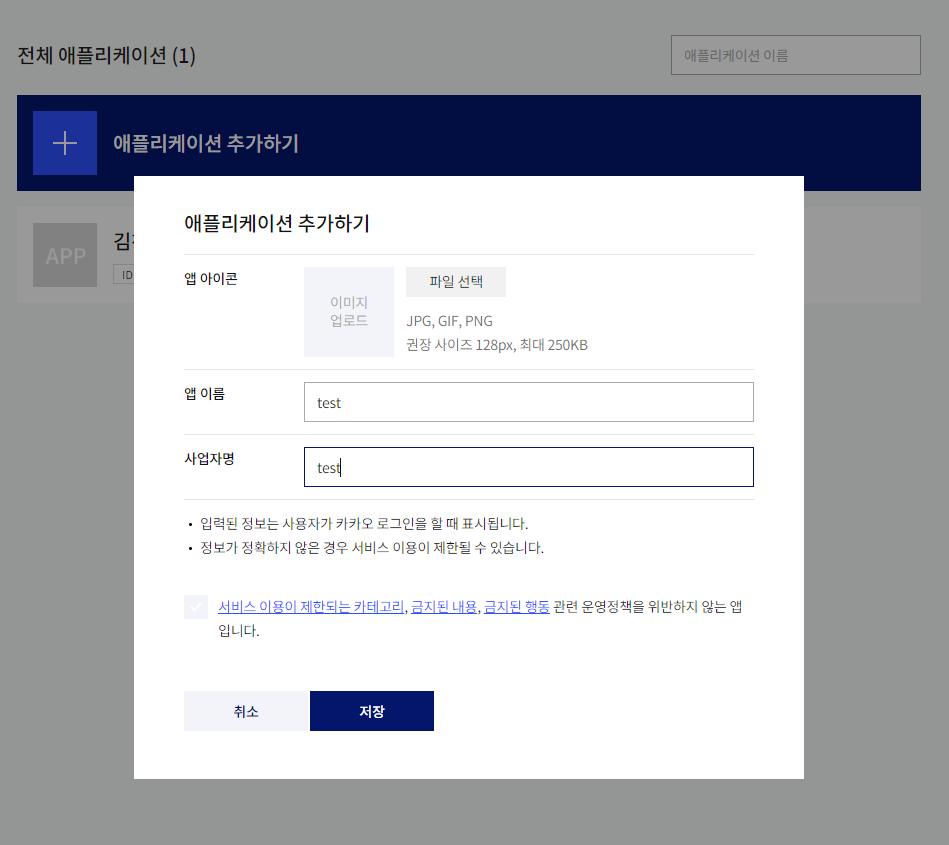
어플리케이션을 추가해준다
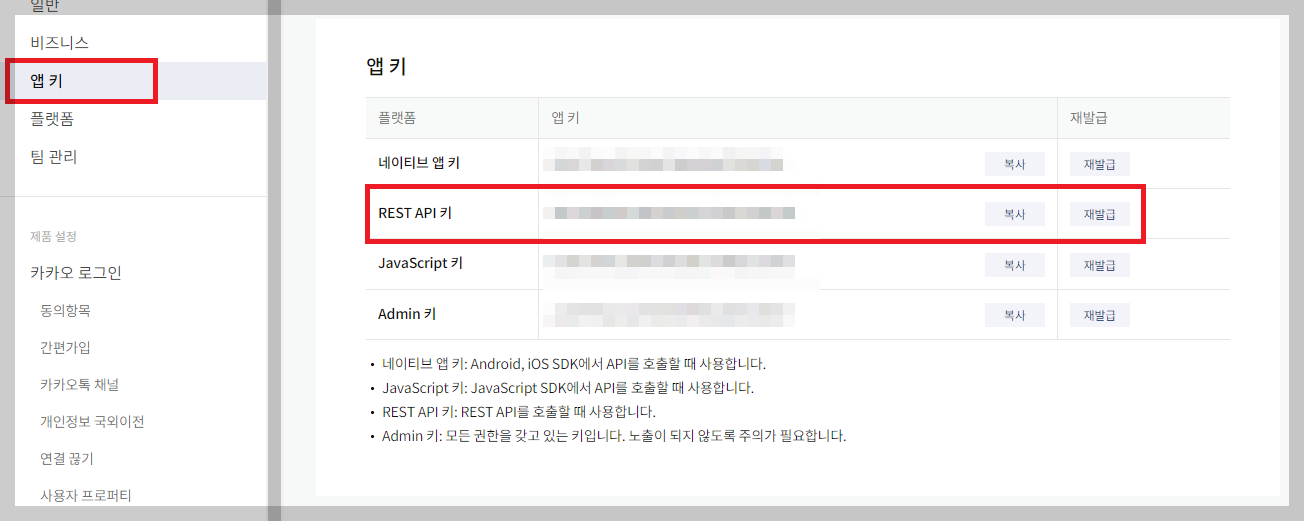
그리고 앱키로 이동하여 REST API키를 복사해준다 이게 Client ID가된다
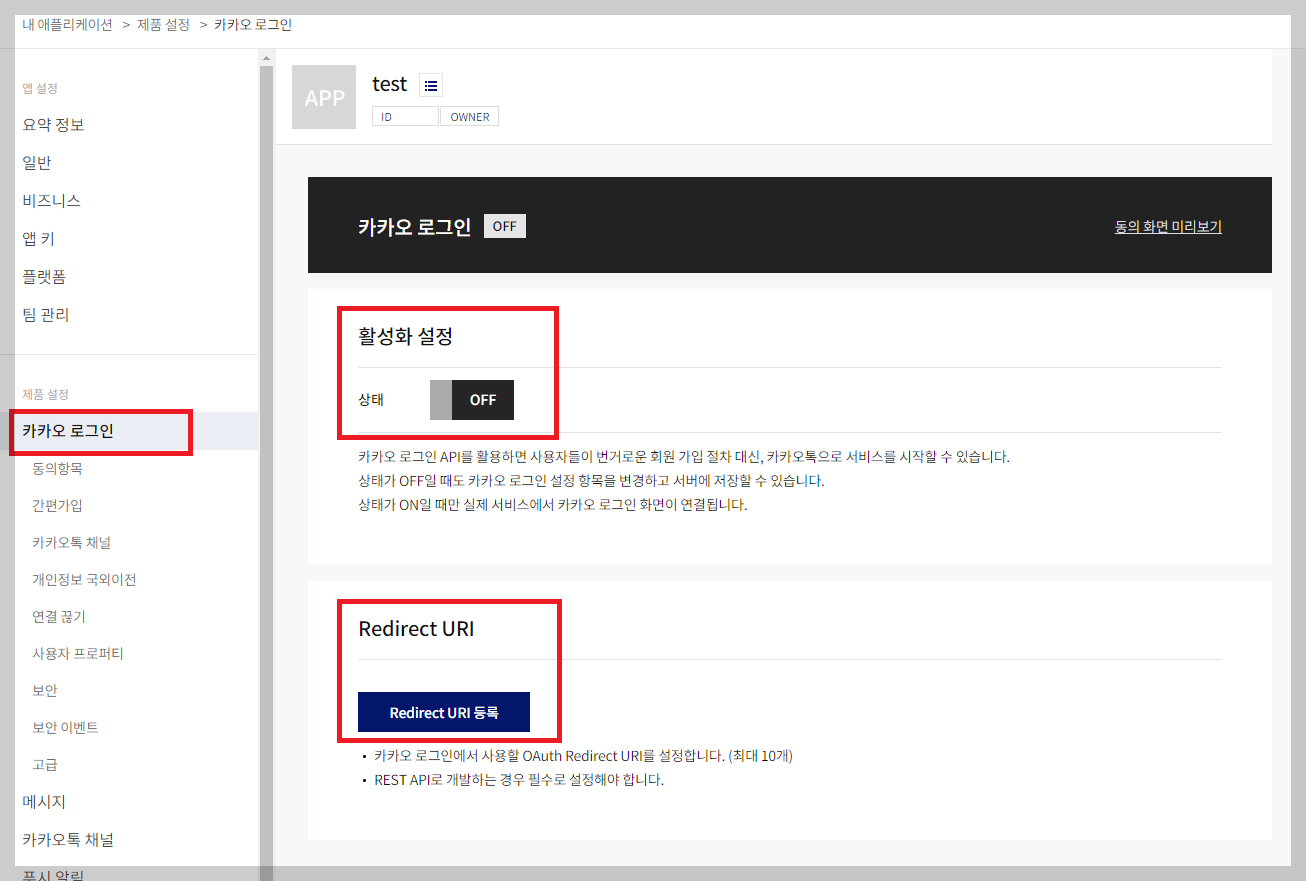
카카오 로그인탭으로 이동하여 활성화를 ON 하고 Redirect URI를 등록해준다
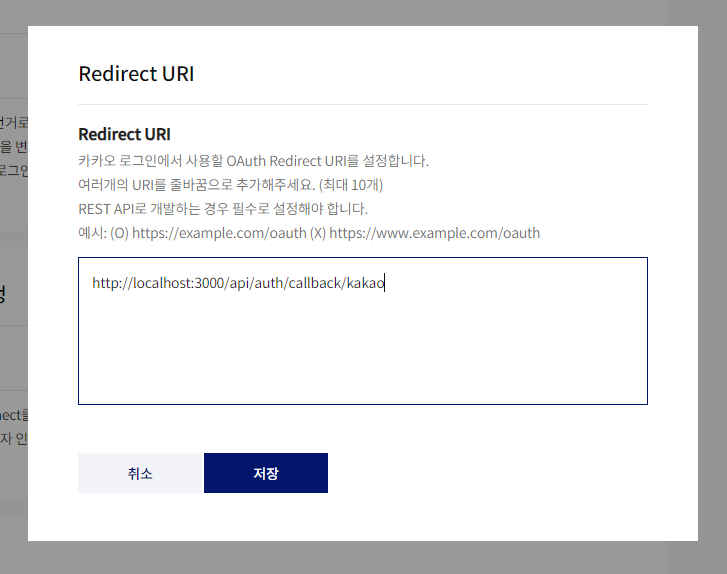
AUTH_ORIGIN + /api/auth/callback/kakao형태로 작성한다
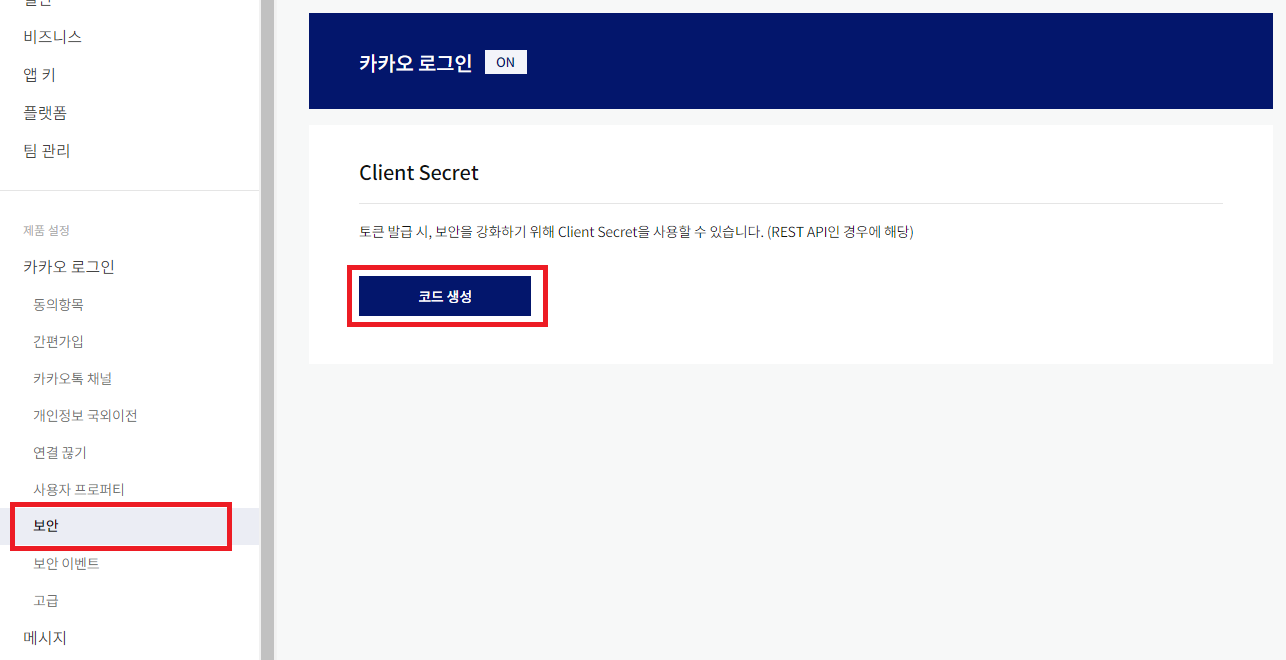
이후 보안으로 이동하여 secret 코드를 생성해준다
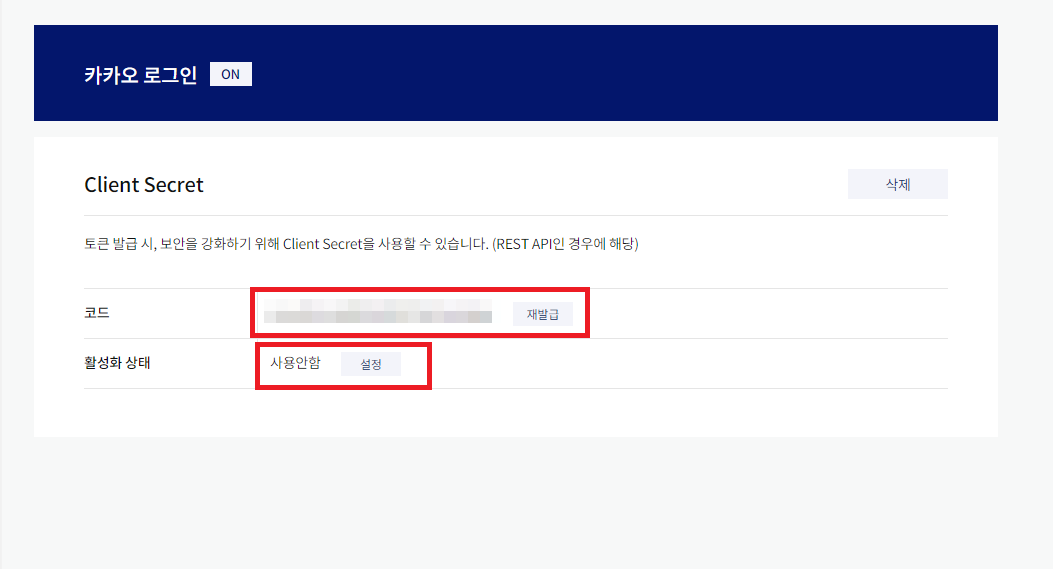
Client Secret 코드를 복사하고 활성화를 사용함으로 변경해준다
이후 Client id와 Client secret을 env에 복사해준다
# .env
AUTH_ORIGIN=http://localhost:3000
AUTH_SECRET=asdhADvanidfvA!@d13dg34asdZXCASD

ADMIN_ID=test
ADMIN_PW=citykim

GITHUB_CLIENT_ID=foo
GITHUB_CLIENT_SECRET=bar

#추가해준다
KAKAO_CLIENT_ID=foo
KAKAO_CLIENT_SECRET=bar
https://console.cloud.google.com/apis/credentials
Google 클라우드 플랫폼
로그인 Google 클라우드 플랫폼으로 이동
accounts.google.com
구글 클라우드 플랫폼으로 이동한다
프로젝트가 없다면 프로젝트를 생성하고
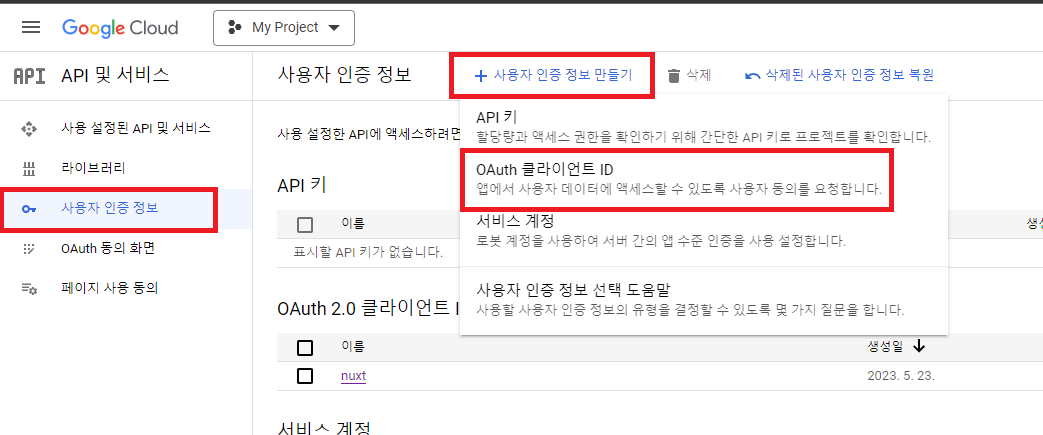
사용자 인증정보로 이동하여 사용자 인증정보에서 OAuth 클라이언트 ID를 생성해준다
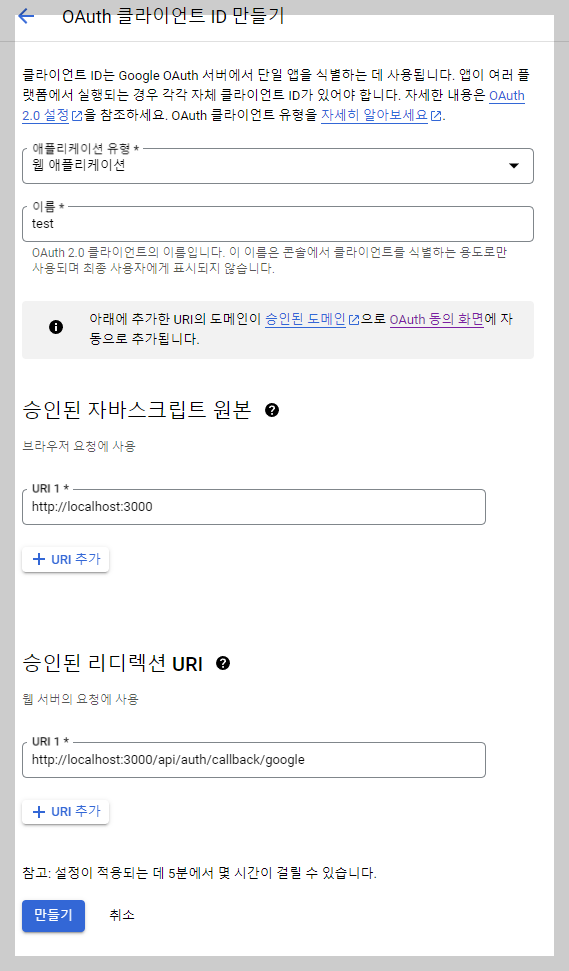
애플리케이션 유형은 웹 애플리케이션으로 작성하고 이름과 브라우저 요청 URI를 작성한다
리디렉션 URI는 AUTH_ORIGIN + /api/auth/callback/google형태로 작성한다
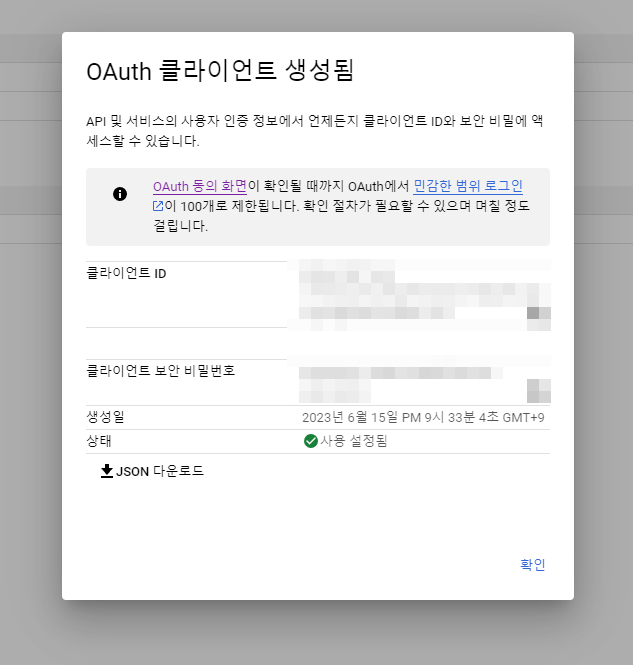
이후 나오는 OAuth 클라이언트 id와 비밀번호를 .env에 입력해준다
# .env
AUTH_ORIGIN=http://localhost:3000
AUTH_SECRET=asdhADvanidfvA!@d13dg34asdZXCASD

ADMIN_ID=test
ADMIN_PW=citykim

GITHUB_CLIENT_ID=foo
GITHUB_CLIENT_SECRET=bar

KAKAO_CLIENT_ID=foo
KAKAO_CLIENT_SECRET=bar

# 추가해준다
GOOGLE_CLIENT_ID=foo
GOOGLE_CLIENT_SECRET=bar
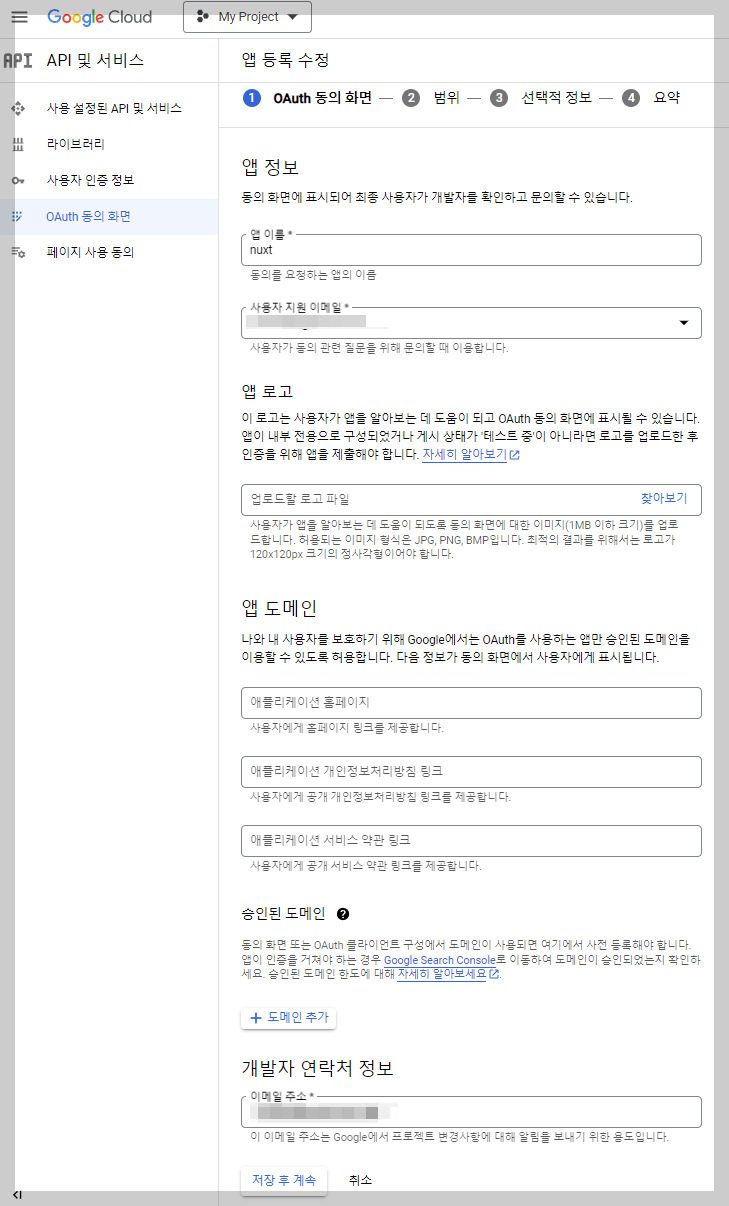
그리고 OAuth 동의화면으로 이동하여 사용자 지원 이메일과 개발자 이메일주소를 작성한뒤 설정을 완료해준다(다른건 굳이 변경하거나 추가하지 않아도됨)
이제 nuxt.config.ts로 이동하여 runtimeConfig를 작성해준다
// nuxt.config.ts
export default defineNuxtConfig({
  devtools: { enabled: true },
  modules: [
    '@sidebase/nuxt-auth',
  ],
  css: [
    '@/assets/scss/app.scss',
  ],
  auth: {
    origin: process.env.AUTH_ORIGIN,
    enableGlobalAppMiddleware: true,
  },
  runtimeConfig: { // runtimeConfig를 추가해준다
    authSecret: process.env.AUTH_SECRET,
    providers: {
      github: {
        id: process.env.GITHUB_CLIENT_ID,
        secret: process.env.GITHUB_CLIENT_SECRET,
      },
      google: {
        id: process.env.GOOGLE_CLIENT_ID,
        secret: process.env.GOOGLE_CLIENT_SECRET,
      },
      kakao: {
        id: process.env.KAKAO_CLIENT_ID,
        secret: process.env.KAKAO_CLIENT_SECRET,
      }
    },
  },
})
runtimeConfig에 직접 작성하거나, env override되도록 네이밍을 맞춰줘도 되지만 이 포스팅에서는 그냥 env에 있는걸 가져오도록 작성하였다
https://nuxt.com/docs/guide/going-further/runtime-config
Runtime Config · Nuxt Advanced
Nuxt provides a runtime config API to expose configuration within your application and server routes, with the ability to update it at runtime by setting environment variables. To expose config and environment variables to the rest of your app, you will ne
nuxt.com
이후 server/api/auth/[...].ts 파일을 수정해준다
// server/api/auth/[...].ts

import CredentialsProvider from 'next-auth/providers/credentials'
import GithubProvider from 'next-auth/providers/github' // 추가해준다
import KakaoProvider from 'next-auth/providers/kakao' // 추가해준다
import GoogleProvider from 'next-auth/providers/google' // 추가해준다
import { NuxtAuthHandler } from '#auth'

interface ServerError extends Error {
  statusCode: number
  statusMessage: string
}

interface Credentials {
  username?: string
  password?: string
}

const runtimeConfig = useRuntimeConfig() // 추가해준다

export default NuxtAuthHandler({
  pages: {
    signIn: '/login',
  },
  secret: process.env.AUTH_SECRET,
  providers: [
    // @ts-expect-error You need to use .default here for it to work during SSR. May be fixed via Vite at some point
    CredentialsProvider.default({
      name: 'Credentials',
      async authorize (credentials: Credentials) {
        try {
          const login = await $fetch('/api/auth/login', {
            method: 'POST',
            body: {
              username: credentials?.username,
              password: credentials?.password
            }
          })
          return login
        } catch (error: ServerError | unknown) {
          if (error) {
            const err: ServerError = error as ServerError
            throw createError(err.statusMessage)
          }
          return null
        }
      }
    }),
    // @ts-expect-error You need to use .default here for it to work during SSR. May be fixed via Vite at some point
    GithubProvider.default({ // 추가해준다
      clientId: runtimeConfig.providers.github.id,
      clientSecret: runtimeConfig.providers.github.secret
    }),
    // @ts-expect-error You need to use .default here for it to work during SSR. May be fixed via Vite at some point
    KakaoProvider.default({ // 추가해준다
      clientId: runtimeConfig.providers.kakao.id,
      clientSecret: runtimeConfig.providers.kakao.secret,
    }),
    // @ts-expect-error You need to use .default here for it to work during SSR. May be fixed via Vite at some point
    GoogleProvider.default({ // 추가해준다
      clientId: runtimeConfig.providers.google.id,
      clientSecret: runtimeConfig.providers.google.secret,
    })
  ]
})
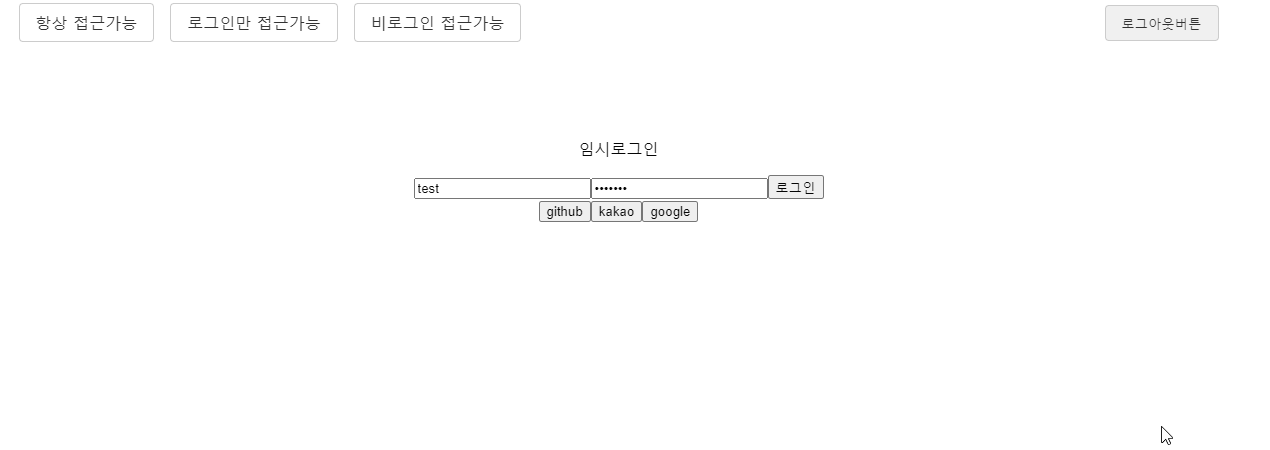
그리고 login.vue 파일에 다음코드를 적당히 추가해준다
// pages/login.vue

    <div>
      <button @click="signIn('github')">github</button>
      <button @click="signIn('kakao')">kakao</button>
      <button @click="signIn('google')">google</button>
    </div>
이제 잘 동작하는지 확인해보자
이로써 nuxt-auth를 활용한 직접로그인과 소셜로그인을 구현하였다
세션은 각 서비스의 로그인 관리에서 끊을 수도 있고, 로그인시 전달되는 토큰을 DB화 시킨뒤 관리할 수도 있다
리포지토리
https://github.com/city-kim/nuxt-auth
GitHub - city-kim/nuxt-auth: nuxt auth를 연동하는 example
nuxt auth를 연동하는 example. Contribute to city-kim/nuxt-auth development by creating an account on GitHub.
github.com
'Vue & Nuxt' 카테고리의 다른 글
| Vue3, unit test, e2e, chromatic github ci구성(2) - ci (0) | 2023.10.19 |
|---|---|
| Vue3, unit test, e2e, chromatic github ci구성(1) - 프로젝트 구성 (0) | 2023.10.18 |
| Nuxt.js로 openai api 연동하여 slack GPT채팅 만들기(4) - 대화 저장 (0) | 2023.03.30 |
| Nuxt.js로 openai api 연동하여 slack GPT채팅 만들기(3) - nuxt, slack, gpt연동 (0) | 2023.03.26 |
| Nuxt.js로 openai api 연동하여 slack GPT채팅 만들기(2) - gpt 연동 (0) | 2023.03.26 |


댓글 영역