고정 헤더 영역
상세 컨텐츠
본문
이번 포스팅에는 GPT를 연동하고 브라우저에서 질문 및 답변까지 하도록 구성해보도록 한다
server 💻
추후 slack을 연동할 것이기 때문에 서버의 디렉토리 구성은 다음과같이 한다
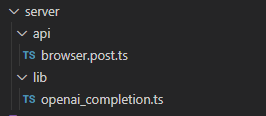
순수하게 gpt와 통신은 openai_completion.ts에서 담당하고
클라이언트에서 api 호출은 browser.post.ts에서 한다
Nuxt3에서는 서버도 디렉토리로 라우팅을 하고 그 안에서 [name].[method].ts로 구분하면 http method와 매칭까지 시켜준다
https://nuxt.com/docs/guide/directory-structure/server#matching-http-method
server/ · Nuxt Directory Structure
Nuxt automatically scans files inside the ~/server/api, ~/server/routes, and ~/server/middleware directories to register API and server handlers with HMR support. Each file should export a default function defined with defineEventHandler(). The handler can
nuxt.com
openai_completion.ts📄
우선 바로 gpt 호출을 만들어보자
yarn add openaiGPT에서 지원하는 openai 패키지를 설치하고
https://www.npmjs.com/package/openai
openai
Node.js library for the OpenAI API. Latest version: 3.2.1, last published: 24 days ago. Start using openai in your project by running `npm i openai`. There are 324 other projects in the npm registry using openai.
www.npmjs.com
api 호출후 response를 저장 또는 활용하기 앞서 타입을 지정해준다

// types/openai.ts
interface ChatList {
  role: 'user'|'assistant'|'system',
  content: string
}

export {
  ChatList
}
여기서 role이라는 타입을 추가하게 되는데 openai api에서는 role이 세가지로 분류된다
해당 값으로 타입을 지정하고 content는 string으로 지정한다
role에 대한 내용은 하단에 첨부
다시 돌아와서 타입을 지정하고 lib/openai_completion.ts 코드를 작성해주자
// server/lib/openai_completion.ts
import { Configuration, OpenAIApi } from 'openai'
import type { ChatList } from '@/types/openai'
export async function chat(messages: Array<ChatList>) {
const configuration = new Configuration({ // configuration 인스턴트 생성
apiKey: process.env.OPENAI_SECRET_KEY, // env의 key를 넣어준다
})
const openai = new OpenAIApi(configuration) // 인스턴스 생성
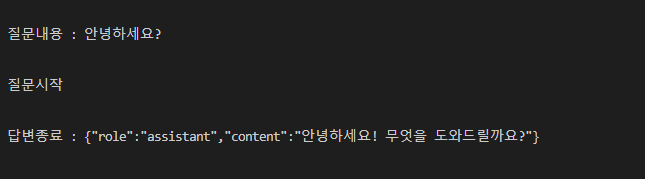
console.log('질문시작')
const result = await openai.createChatCompletion({
model: 'gpt-3.5-turbo', // 사용할 모델
messages: messages, // 사용될 메시지
}).catch((err) => {
console.log(err)
})
if (result) {
console.log('답변종료 : ' + JSON.stringify(result.data.choices[0].message))
return Promise.resolve(result.data.choices[0].message)
}
}chat 함수에 전달될 parameter는 앞서 선언된 ChatList의 타입으로 전달되고 배열의 형태로 한다
configuration 클래스를 인스턴스 생성하여 초기화해준뒤 api 키를 입력해준다
보안을 위해 organization이나 username password 등등을 넣을 수 있지만 여기선 활용하지않는다
이후 openai 인스턴스를 생성하고 모델에게 질문을 던진다
completions의 request body에 model은 'gpt-3.5-turbo', message는 전달된 parameter 값으로 한다
이후 result가 제대로 도착하면 답변을 return하여 종료한다
https://platform.openai.com/docs/api-reference/chat/create
OpenAI API
An API for accessing new AI models developed by OpenAI
platform.openai.com
request body에 포함될 수 있는 값들은 하단부에 첨부
browser.post.ts📄
브라우저에서 전달한 값을 gpt에 전달해서 답변을 받고 배열에 임시저장해서 잠시나마 채팅이 되도록 해보자
서비스가 크다면 DB를 구성하는게 좋지만, 간단하게 만들기위해 추후에는 json을 활용하여 저장, 불러오기를 추가하도록 하자
// server/api/browser.post.ts
import { chat } from '@/server/lib/openai_completion'
import type { ChatList } from '@/types/openai'

const conversation: Array<ChatList> = [] // 나눈 대화를 저장해서 기억하도록 함

export default defineEventHandler(async (event) => {
  // GPT에게 물어보기
  const body = await readBody(event)
  if (body.prompt) {
    // result값이 들어갔을때 배열에 저장
    console.log('질문내용 : ' + body.prompt)
    conversation.push({role: 'user', content: body.prompt})

    // 질문던지기
    const quest = await chat(conversation)
    if (quest) {
      // 답변이 정상적으로 왔다면 리턴
      conversation.push(quest)
      return {
        result: quest,
      }
    }
  } else {
    // 질문이 없는경우
    throw createError({
      statusCode: 400,
      statusMessage: '질문이 입력되지 않았습니다.',
    })
  }
})
서버 구동중에는 대화를 저장하도록 conversation 배열을 생성해두고
event를 readBody() 함수를 사용하여 클라이언트에서 전달한 값을 가져온다
이때 prompt가 없다면 에러를 반환하고 값이 있다면 conversation에 저장해준뒤 await으로 이전에 만든 chat 함수에 전달한다
데이터가 제대로 수신됐다면 conversation에 추가해주고 값을 return한다
Client🙃
gpt에게 채팅하는 api는 만들었으니 이제 클라이언트 코드를 작성해보자
이전에 테스트한 코드를 삭제하고 pages/index.vue의 코드를 다음과같이 바꾼다
<script setup lang="ts">
import type { ChatList } from '@/types/openai'
const conversation = ref<Array<ChatList>>([]) // 대화를 담을 배열
const prompt = ref('') // 서버에 넘겨줄 질문

async function quest () {
    // 질문시작
    const string = prompt.value // 질문값을 저장
    conversation.value.push({role: 'user', content: string}) // 대화리스트에 push
    prompt.value = '' // textarea초기화
    const data = await $fetch('/api/browser', {
      method: 'POST',
      body: { prompt: string }
    }).catch((err) => {
      // 실패시
      alert('실패!')
      console.log(err)
    })

    if (data?.result) {
      // 값이 전달됐다면 배열에 push
      conversation.value.push(data.result)
    }
}
</script>

<template>
  <ul class="p-5">
    <li
      v-for="(list, index) in conversation"
      :key="index"
    >
      {{ list }}
    </li>
  </ul>

  <fieldset>
    <textarea
      v-model="prompt"
      class="border"
    >prompt</textarea>
    <button
      type="button"
      @click="quest()"
    >
      질문
    </button>
  </fieldset>
</template>
클라이언트에서도 conversation 배열에 값을 담아서 출력하는 용도로 사용한다
prompt의 값을 그대로 사용하면 textarea를 비워줄 수 없기 때문에 string에 값을 할당해주고 서버에 전송하기 직전에 prompt의 value를 초기화해준다
이후 서버에서 데이터가 정상적으로 전달되면 conversation에 push 해준다
리스트는 ul의 li를 v-for로 반복하여 출력하였고, button에 click이벤트가 발생하면 quest함수를 호출하여 실행하였다
이제 GPT와 브라우저로 채팅할 수 있게 되었다!🎉
Decorating
밋밋하기에 조금 꾸며준 코드를 첨부한다
app.vue
app.vue의 크기를 정의하고 background를 설정한뒤
// app.vue
<template>
  <div class="w-screen h-screen bg-gray-50">
    <NuxtPage />
  </div>
</template>
svg components
components 폴더와 svg폴더를 생성하고 아래 svg 컴포넌트를 추가한다
// components/svg/assistant.vue
<template>
  <div>
    <svg
      shape-rendering="geometricPrecision"
      text-rendering="geometricPrecision"
      image-rendering="optimizeQuality"
      fill-rule="evenodd"
      clip-rule="evenodd"
      viewBox="0 0 512 512"
    >
      <rect
        fill="#10A37F"
        rx="104.187"
        ry="105.042"
      />
      <path
        fill="#fff"
        fill-rule="nonzero"
        d="M378.68 230.011a71.432 71.432 0 003.654-22.541 71.383 71.383 0 00-9.783-36.064c-12.871-22.404-36.747-36.236-62.587-36.236a72.31 72.31 0 00-15.145 1.604 71.362 71.362 0 00-53.37-23.991h-.453l-.17.001c-31.297 0-59.052 20.195-68.673 49.967a71.372 71.372 0 00-47.709 34.618 72.224 72.224 0 00-9.755 36.226 72.204 72.204 0 0018.628 48.395 71.395 71.395 0 00-3.655 22.541 71.388 71.388 0 009.783 36.064 72.187 72.187 0 0077.728 34.631 71.375 71.375 0 0053.374 23.992H271l.184-.001c31.314 0 59.06-20.196 68.681-49.995a71.384 71.384 0 0047.71-34.619 72.107 72.107 0 009.736-36.194 72.201 72.201 0 00-18.628-48.394l-.003-.004zM271.018 380.492h-.074a53.576 53.576 0 01-34.287-12.423 44.928 44.928 0 001.694-.96l57.032-32.943a9.278 9.278 0 004.688-8.06v-80.459l24.106 13.919a.859.859 0 01.469.661v66.586c-.033 29.604-24.022 53.619-53.628 53.679zm-115.329-49.257a53.563 53.563 0 01-7.196-26.798c0-3.069.268-6.146.79-9.17.424.254 1.164.706 1.695 1.011l57.032 32.943a9.289 9.289 0 009.37-.002l69.63-40.205v27.839l.001.048a.864.864 0 01-.345.691l-57.654 33.288a53.791 53.791 0 01-26.817 7.17 53.746 53.746 0 01-46.506-26.818v.003zm-15.004-124.506a53.5 53.5 0 0127.941-23.534c0 .491-.028 1.361-.028 1.965v65.887l-.001.054a9.27 9.27 0 004.681 8.053l69.63 40.199-24.105 13.919a.864.864 0 01-.813.074l-57.66-33.316a53.746 53.746 0 01-26.805-46.5 53.787 53.787 0 017.163-26.798l-.003-.003zm198.055 46.089l-69.63-40.204 24.106-13.914a.863.863 0 01.813-.074l57.659 33.288a53.71 53.71 0 0126.835 46.491c0 22.489-14.033 42.612-35.133 50.379v-67.857c.003-.025.003-.051.003-.076a9.265 9.265 0 00-4.653-8.033zm23.993-36.111a81.919 81.919 0 00-1.694-1.01l-57.032-32.944a9.31 9.31 0 00-4.684-1.266 9.31 9.31 0 00-4.684 1.266l-69.631 40.205v-27.839l-.001-.048c0-.272.129-.528.346-.691l57.654-33.26a53.696 53.696 0 0126.816-7.177c29.644 0 53.684 24.04 53.684 53.684a53.91 53.91 0 01-.774 9.077v.003zm-150.831 49.618l-24.111-13.919a.859.859 0 01-.469-.661v-66.587c.013-29.628 24.053-53.648 53.684-53.648a53.719 53.719 0 0134.349 12.426c-.434.237-1.191.655-1.694.96l-57.032 32.943a9.272 9.272 0 00-4.687 8.057v.053l-.04 80.376zm13.095-28.233l31.012-17.912 31.012 17.9v35.812l-31.012 17.901-31.012-17.901v-35.8z"
      />
    </svg>
  </div>
</template>
// components/svg/letter.vue
<template>
<div>
<svg viewBox="0 0 16 16">
<path d="M8.47 1.318a1 1 0 0 0-.94 0l-6 3.2A1 1 0 0 0 1 5.4v.817l3.235 1.94a2.76 2.76 0 0 0-.233 1.027L1 7.384v5.733l3.479-2.087c.15.275.335.553.558.83l-4.002 2.402A1 1 0 0 0 2 15h12a1 1 0 0 0 .965-.738l-4.002-2.401c.223-.278.408-.556.558-.831L15 13.117V7.383l-3.002 1.801a2.76 2.76 0 0 0-.233-1.026L15 6.217V5.4a1 1 0 0 0-.53-.882l-6-3.2ZM7.06.435a2 2 0 0 1 1.882 0l6 3.2A2 2 0 0 1 16 5.4V14a2 2 0 0 1-2 2H2a2 2 0 0 1-2-2V5.4a2 2 0 0 1 1.059-1.765l6-3.2ZM8 7.993c1.664-1.711 5.825 1.283 0 5.132-5.825-3.85-1.664-6.843 0-5.132Z" />
</svg>
</div>
</template>// components/svg/user.vue
<template>
<div>
<svg viewBox="0 0 16 16">
<path d="M11 6a3 3 0 1 1-6 0 3 3 0 0 1 6 0z" />
<path d="M0 8a8 8 0 1 1 16 0A8 8 0 0 1 0 8zm8-7a7 7 0 0 0-5.468 11.37C3.242 11.226 4.805 10 8 10s4.757 1.225 5.468 2.37A7 7 0 0 0 8 1z" />
</svg>
</div>
</template>custom.css
custom.css에 로더를 추가하여 로딩을 구현하도록 해준뒤
/* assets/css/custom.css */
@layer components {
  .loader {
    display: block;
    width: 16px;
    height: 16px;
    border-radius: 50%;
    background-color: #ddd;
    box-shadow: 32px 0 #ddd, 64px 0 #ddd;
    position: relative;
    text-indent: -9999px;
    animation: flash 0.5s ease-out infinite alternate;
  }

  @keyframes flash {
    0% {
      background-color: #aaa;
      box-shadow: 32px 0 #aaa, 64px 0 #ddd;
    }
    50% {
      background-color: #ddd;
      box-shadow: 32px 0 #aaa, 64px 0 #aaa;
    }
    100% {
      background-color: #aaa;
      box-shadow: 32px 0 #ddd, 64px 0 #aaa;
    }
  }
}
pages/index.vue
pages/index.vue에 로딩 클래스와 svg 컴포넌트 등으로 약간 꾸며준다
// pages/index.vue
<script setup lang="ts">
import type { ChatList } from '@/types/openai'
import User from '@/components/svg/user.vue'
import Assistant from '@/components/svg/assistant.vue'
import Letter from '@/components/svg/letter.vue'

const conversation = ref<Array<ChatList>>([]) // 대화를 담을 배열

const contentList = ref<HTMLUListElement | null>(null) // ul element
const loading = ref<boolean>(false) // 로딩 상태

const prompt = ref('') // 서버에 넘겨줄 질문
const height = computed(() => {
  // 프롬프트에 개행이 포함된경우 textarea 높이값을 자동으로 보정하자
  if (prompt.value) {
    const row = prompt.value.match(/\n/g)
    if (row) {
      return `${3 + (row.length * 1.5)}rem`
    }
  }
  return '3rem'
})

async function quest () {
  // 질문시작
  const string = prompt.value // 질문값 string 저장
  conversation.value.push({role: 'user', content: string}) // 대화 리스트에 push
  loading.value = true // 로딩시작
  prompt.value = '' // textare를 초기화한다
  setTimeout(() => {
    if (contentList) {
      // 질문 후 스크롤을 최하단으로 이동시키기
      contentList.value?.scrollTo(0, contentList.value.scrollHeight)
    }
  }, 500) // 추가되는 시점을 보정하기위해 0.5초 지연
  const data = await $fetch('/api/browser', {
    method: 'POST',
    body: { prompt: string }
  }).catch((err) => {
    // 실패시
    alert('실패!')
    console.log(err)
  })

  loading.value = false // 로딩종료
  if (data?.result) {
    // 값이 전달됐다면 배열에 push
    conversation.value.push(data.result)
  }

  if (contentList) {
    // 답변 추가후 스크롤 최하단 이동
    contentList.value?.scrollTo(0, contentList.value.scrollHeight)
  }
}

function enterSubmit (e: KeyboardEvent) {
  // 엔터로 전송하기
  if (!e.shiftKey) {
    // 시프트키 없이 입력된경우만
    e.preventDefault()
    if (prompt.value) {
      // 질문이 있는경우에만 전송
      quest()
    }
  }
}

</script>
<template>
  <div class="grid w-full h-full align-top">
    <ul
      ref="contentList"
      class="w-full max-h-screen overflow-auto"
    >
      <li
        v-for="(list, index) in conversation"
        :key="index"
        class="px-5 py-8"
        :class="{
          'bg-gray-100': list.role == 'assistant',
          'border-t': list.role == 'assistant',
          'border-b': list.role == 'assistant',
        }"
      >
        <div class="flex gap-5 max-w-screen-lg mx-auto align-baseline">
          <div class="w-8">
            <User
              v-show="list.role == 'user'"
              class="w-8 h-8 fill-blue-500"
            />
            <Assistant
              v-show="list.role == 'assistant'"
              class="w-8 h-8 bg-green-500"
            />
          </div>
          <p class="flex-auto pt-0 whitespace-pre-wrap">
            {{ list.content }}
          </p>
        </div>
      </li>
      <li
        v-show="loading"
        class="px-5 py-8 bg-gray-100 border-t border-b"
      >
        <div class="flex gap-5 max-w-screen-lg mx-auto align-baseline">
          <div class="w-8">
            <Assistant class="w-8 h-8 bg-green-500" />
          </div>
          <i class="mt-3 loader">loading</i>
        </div>
      </li>
    </ul>
    <div class="flex w-full mt-auto justify-center">
      <div class="w-full max-w-screen-lg mb-3 resize-none relative">
        <textarea
          v-model="prompt"
          class="w-full p-3 resize-none border border-gray-200 rounded shadow focus:shadow-xl outline-none overflow-hidden"
          :style="{height: height}"
          placeholder="무엇이든 질문하세요!"
          @keydown.enter="enterSubmit($event)"
        >prompt</textarea>
        <button
          class="px-3 py-2 hover:bg-gray-100 rounded absolute top-1/2 transform -translate-y-1/2 right-3"
          type="button"
          @click="quest"
        >
          <Letter class="w-4 h-4 fill-gray-500" />
        </button>
      </div>
    </div>
  </div>
</template>
결과물은 아래와같다
짭 GPT 완성 🤣
이로써 openai api를 연동하고 사용하고 나아가 어느정도 언어모델이 동작하는걸 작게나마 이해해볼 수 있었다!
다음 포스팅에서는 기능을 좀 더 확장하고 slack과 연동해보도록 하자
request body에 대한 내용은 별도의 포스팅으로 분리함
https://city-kim.tistory.com/12
Openai api의 chat completions의 Request body의 예제
Openai api🔍 Request body reqeust body에는 각각 다음과같은 항목이 포함될 수 있다 model: 'gpt-3.5-turbo', // 사용할 모델 messages: messages, // 사용될 메시지 temperature: 1, // 샘플링값 top_p: 1, // 샘플링시 상위값
city-kim.tistory.com
'Vue & Nuxt' 카테고리의 다른 글
| Vue3, unit test, e2e, chromatic github ci구성(1) - 프로젝트 구성 (0) | 2023.10.18 |
|---|---|
| Nuxt 직접로그인, 소셜로그인 구현하기 (Nuxt-auth) (1) | 2023.06.15 |
| Nuxt.js로 openai api 연동하여 slack GPT채팅 만들기(4) - 대화 저장 (0) | 2023.03.30 |
| Nuxt.js로 openai api 연동하여 slack GPT채팅 만들기(3) - nuxt, slack, gpt연동 (0) | 2023.03.26 |
| Nuxt.js로 openai api 연동하여 slack GPT채팅 만들기(1) - nuxt 서버설정 (0) | 2023.03.26 |


댓글 영역